本文为社区成员 Jun Chen 为 百姓 AI 和 Hugging Face 联合举办的黑客松所撰写的教程文档,欢迎你阅读今天的第二条推送了解和参加本次黑客松活动。文内含有较多链接,我们不再一一贴出,请 点击这里 查看渲染后的 Notebook 文件。
随着人工智能和大模型 ChatGPT 的持续火爆,越来越多的个人和创业者都想并且可以通过自己创建人工智能 APP 来探索这个新兴领域的机会。只要你有一个想法,你就可以通过各种开放社区和资源实现一些简单功能,满足特定领域或者用户的需求。
试想现在有一部新的电影刚刚上线了,我们和朋友在家热烈的讨论着这部新的电影,这些都是非常有价值的电影评价的信息,不过估计这个时候很少有人会特地去登陆自己的豆瓣账号再去发表这些刚刚的评论,如果有一个电影评论机器人可以自动收集这些评论并且根据评论打分,然后自动上传到制定的电影评论网站呢?再比如,我们在某个餐厅吃饭,我们只用对着手机说几句话,我们的评分就自动上传到大众点评呢?我们来试试如何实现这样一个小小的机器人吧!
在本教程中,我们将探索如何使用 Hugging Face 资源来 Finetune 一个模型且构建一个电影评分机器人。我们将向大家展示如何整合这些资源,让你的聊天机器人具备总结评论并给出评分的功能。我们会用通俗易懂的语言引导你完成这个有趣的项目!
为了可以简单的说明实现的步骤,我们简化这个【电影打分机器人】的实现方法:
- App 直接收集来自
input的text作为输入,有兴趣的小伙伴们可以研究一下如何接入到语音,Whisper to ChatGPT 是一个很有好的例子。 - App 不会实现自动上传评价到特定网站。
第一步: 训练电影评价打分模型
首先我们需要一个可以看懂评论且给评论打分的模型,这个例子选用的是利用数据集 IMDb 微调 DistilBERT,微调后的模型可以预测一个电影的评论是正面的还是负面的且给出评分(五分满分)。
当然大家可以根据各自的需求找到不同的数据集来 Finetune 模型,也可以使用不同的基础模型,Hugging Face 上提供了很多可选项。
本任务使用或间接使用了下面模型的架构:
ALBERT, BART, BERT, BigBird, BigBird-Pegasus, BLOOM, CamemBERT, CANINE, ConvBERT, CTRL, Data2VecText, DeBERTa, DeBERTa-v2, DistilBERT, ELECTRA, ERNIE, ErnieM, ESM, FlauBERT, FNet, Funnel Transformer, GPT-Sw3, OpenAI GPT-2, GPT Neo, GPT-J, I-BERT, LayoutLM, LayoutLMv2, LayoutLMv3, LED, LiLT, Longformer, LUKE, MarkupLM, mBART, Megatron-BERT, MobileBERT, MPNet, MVP, Nezha, Nyströmformer, OpenAI GPT, OPT, Perceiver, PLBart, QDQBert, Reformer, RemBERT, RoBERTa, RoBERTa-PreLayerNorm, RoCBert, RoFormer, SqueezeBERT, TAPAS, Transformer-XL, XLM, XLM-RoBERTa, XLM-RoBERTa-XL, XLNet, X-MOD, YOSO
# Transformers installation
! pip install transformers datasets evaluate
# To install from source instead of the last release, comment the command above and uncomment the following one.
# ! pip install git+https://github.com/huggingface/transformers.git
在使用本示例前请安装如下库文件:
pip install transformers datasets evaluate
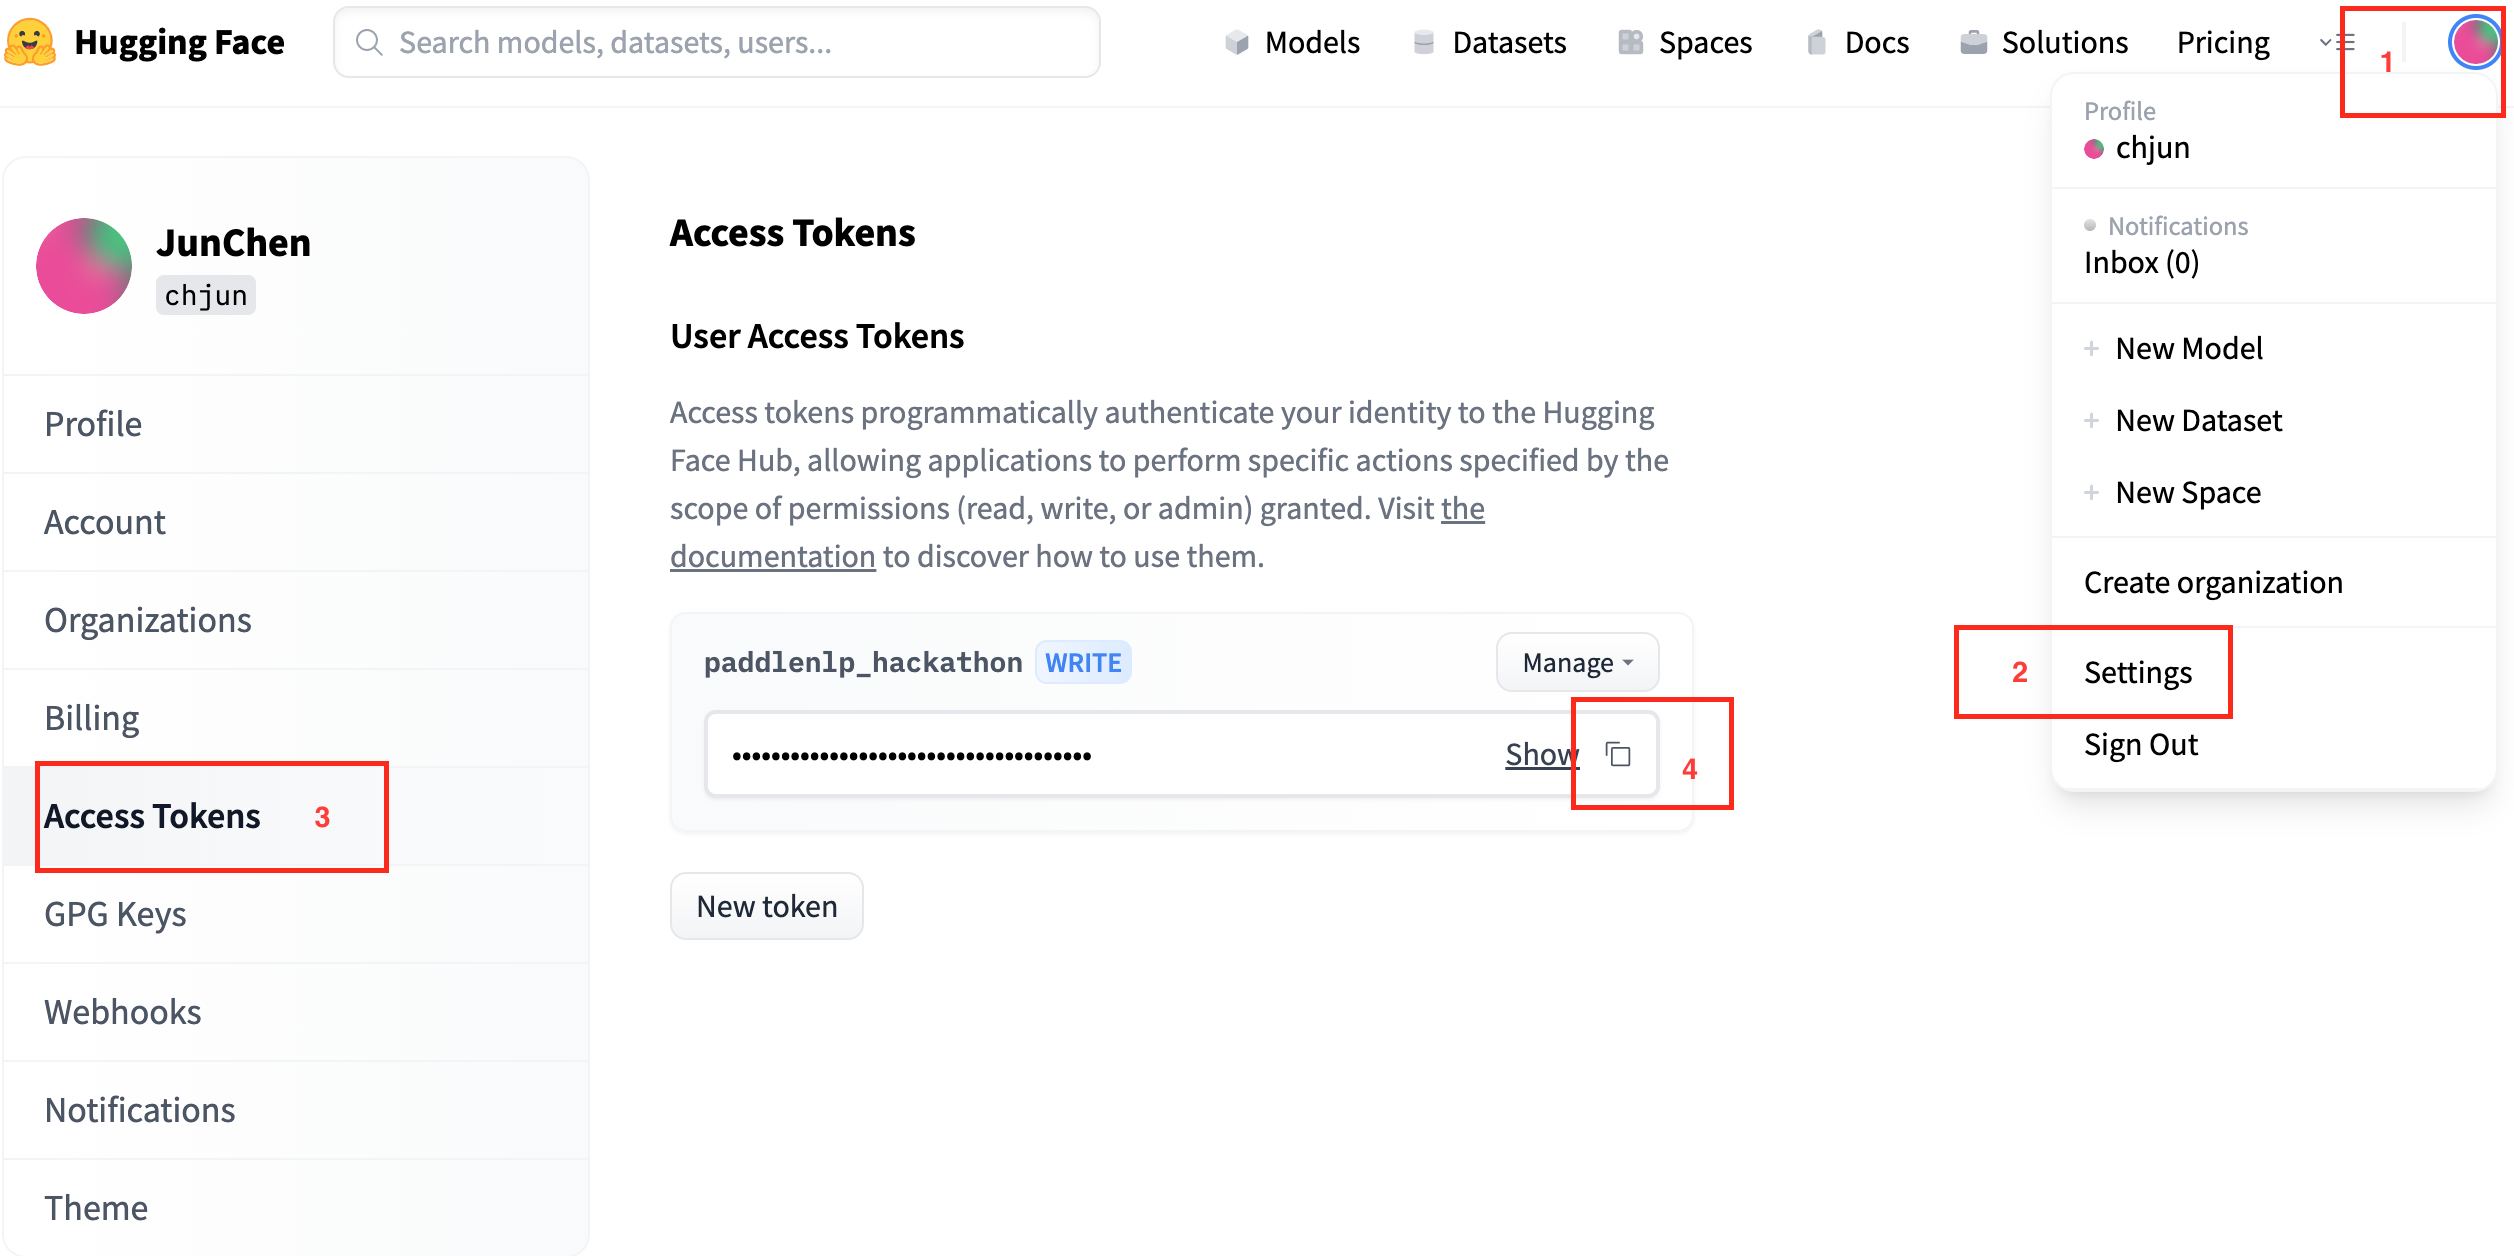
我们建议登陆 Hugging Face 账户进行操作,这样就可以方便的上传和分享自己创建的模型。当有弹框时请输入个人的 token 。根据下图找到我们自己的 Hugging Face Tokens。
from huggingface_hub import notebook_login

notebook_login()
Token is valid.
Your token has been saved in your configured git credential helpers (store).
Your token has been saved to /root/.cache/huggingface/token
Login successful
加载 IMDb 数据集
开始从 Datasets 库中加载 IMDb 数据集 ![]() :
:
from datasets import load_dataset

imdb = load_dataset("imdb")
Downloading builder script:   0%|          | 0.00/4.31k [00:00<?, ?B/s]
Downloading metadata:   0%|          | 0.00/2.17k [00:00<?, ?B/s]
Downloading readme:   0%|          | 0.00/7.59k [00:00<?, ?B/s]
Downloading and preparing dataset imdb/plain_text to /root/.cache/huggingface/datasets/imdb/plain_text/1.0.0/d613c88cf8fa3bab83b4ded3713f1f74830d1100e171db75bbddb80b3345c9c0...
Downloading data:   0%|          | 0.00/84.1M [00:00<?, ?B/s]
Generating train split:   0%|          | 0/25000 [00:00<?, ? examples/s]
Generating test split:   0%|          | 0/25000 [00:00<?, ? examples/s]
Generating unsupervised split:   0%|          | 0/50000 [00:00<?, ? examples/s]
Dataset imdb downloaded and prepared to /root/.cache/huggingface/datasets/imdb/plain_text/1.0.0/d613c88cf8fa3bab83b4ded3713f1f74830d1100e171db75bbddb80b3345c9c0. Subsequent calls will reuse this data.
  0%|          | 0/3 [00:00<?, ?it/s]
检查一下数据是否载入成功:
imdb["test"][0]
{'text': 'I love sci-fi and am willing to put up with a lot. Sci-fi movies/TV are usually underfunded, under-appreciated and misunderstood. I tried to like this, I really did, but it is to good TV sci-fi as Babylon 5 is to Star Trek (the original). Silly prosthetics, cheap cardboard sets, stilted dialogues, CG that doesn\'t match the background, and painfully one-dimensional characters cannot be overcome with a \'sci-fi\' setting. (I\'m sure there are those of you out there who think Babylon 5 is good sci-fi TV. It\'s not. It\'s clichéd and uninspiring.) While US viewers might like emotion and character development, sci-fi is a genre that does not take itself seriously (cf. Star Trek). It may treat important issues, yet not as a serious philosophy. It\'s really difficult to care about the characters here as they are not simply foolish, just missing a spark of life. Their actions and reactions are wooden and predictable, often painful to watch. The makers of Earth KNOW it\'s rubbish as they have to always say "Gene Roddenberry\'s Earth..." otherwise people would not continue watching. Roddenberry\'s ashes must be turning in their orbit as this dull, cheap, poorly edited (watching it without advert breaks really brings this home) trudging Trabant of a show lumbers into space. Spoiler. So, kill off a main character. And then bring him back as another actor. Jeeez! Dallas all over again.',
 'label': 0}
在这个数据集中有两个字段:
text: 电影评论。label: 0 或者 1。0代表负面评价、1代表正面评价。
输入数据预处理
这一步是加载 DistilBERT tokenizer,并创建一个预处理函数来预处理 text,且保证输入不会大于 DistilBERT 的最长输入要求:
from transformers import AutoTokenizer

tokenizer = AutoTokenizer.from_pretrained("distilbert-base-uncased")
def preprocess_function(examples):
    return tokenizer(examples["text"], truncation=True)
Downloading (…)okenizer_config.json:   0%|          | 0.00/28.0 [00:00<?, ?B/s]
Downloading (…)lve/main/config.json:   0%|          | 0.00/483 [00:00<?, ?B/s]
Downloading (…)solve/main/vocab.txt:   0%|          | 0.00/232k [00:00<?, ?B/s]
Downloading (…)/main/tokenizer.json:   0%|          | 0.00/466k [00:00<?, ?B/s]
使用 ![]() Datasets map 函数把预处理函数应用到整个数据集中。 我们还可以使用
Datasets map 函数把预处理函数应用到整个数据集中。 我们还可以使用 batched=True 来加速 map:
tokenized_imdb = imdb.map(preprocess_function, batched=True)
使用 DataCollatorWithPadding 来生成数据包,这样动态的填充数据包到最大长度能够更加节省资源。
from transformers import DataCollatorWithPadding

data_collator = DataCollatorWithPadding(tokenizer=tokenizer)
模型评测函数
选择一个合适的测评指标是至关重要的。大家可以直接调用库函数 ![]() Evaluate 里的各种测评指标。在这个例子中,我们使用了accuracy,了解更多请 查看文档快速上手:
Evaluate 里的各种测评指标。在这个例子中,我们使用了accuracy,了解更多请 查看文档快速上手:
import evaluate

accuracy = evaluate.load("accuracy")
Downloading builder script: 0%| | 0.00/4.20k [00:00<?, ?B/s]
这里我们需要定义一个可以 计算 指标的函数:
import numpy as np

def compute_metrics(eval_pred):
    predictions, labels = eval_pred
    predictions = np.argmax(predictions, axis=1)
    return accuracy.compute(predictions=predictions, references=labels)
训练模型
在开始训练前,需要定义一个id到标签和标签到id的 map :
id2label = {0: "NEGATIVE", 1: "POSITIVE"}
label2id = {"NEGATIVE": 0, "POSITIVE": 1}
如果不熟悉如何使用 Trainer 来训练模型, 可以查看更详细的教程!
好了,一切已经准备就绪!我们可以使用 AutoModelForSequenceClassification 加载 DistilBERT 模型:
from transformers import AutoModelForSequenceClassification, TrainingArguments, Trainer

model = AutoModelForSequenceClassification.from_pretrained(
    "distilbert-base-uncased", num_labels=2, id2label=id2label, label2id=label2id
)
Downloading pytorch_model.bin:   0%|          | 0.00/268M [00:00<?, ?B/s]

Some weights of the model checkpoint at distilbert-base-uncased were not used when initializing DistilBertForSequenceClassification: ['vocab_layer_norm.bias', 'vocab_transform.bias', 'vocab_transform.weight', 'vocab_projector.weight', 'vocab_layer_norm.weight', 'vocab_projector.bias']
- This IS expected if you are initializing DistilBertForSequenceClassification from the checkpoint of a model trained on another task or with another architecture (e.g. initializing a BertForSequenceClassification model from a BertForPreTraining model).
- This IS NOT expected if you are initializing DistilBertForSequenceClassification from the checkpoint of a model that you expect to be exactly identical (initializing a BertForSequenceClassification model from a BertForSequenceClassification model).
Some weights of DistilBertForSequenceClassification were not initialized from the model checkpoint at distilbert-base-uncased and are newly initialized: ['pre_classifier.bias', 'classifier.weight', 'classifier.bias', 'pre_classifier.weight']
You should probably TRAIN this model on a down-stream task to be able to use it for predictions and inference.
接下来只有三步需要完成:
- 在 TrainingArguments 中定义模型超参,只有
output_dir参数是必须的。我们可以设置push_to_hub=True来直接上传训练好的模型(如果已经登陆了Hugging Face)。在每一个训练段,Trainer 都会评测模型的 accuracy 和保存此节点。 - 传入超参数,模型,数据集和评测函数到 Trainer。
- 调用 train() 来微调模型。
training_args = TrainingArguments(
    output_dir="my_awesome_model",
    learning_rate=2e-5,
    per_device_train_batch_size=16,
    per_device_eval_batch_size=16,
    num_train_epochs=2,
    weight_decay=0.01,
    evaluation_strategy="epoch",
    save_strategy="epoch",
    load_best_model_at_end=True,
    push_to_hub=True,
)

trainer = Trainer(
    model=model,
    args=training_args,
    train_dataset=tokenized_imdb["train"],
    eval_dataset=tokenized_imdb["test"],
    tokenizer=tokenizer,
    data_collator=data_collator,
    compute_metrics=compute_metrics,
)

trainer.train()
Cloning https://huggingface.co/chenglu/my_awesome_model into local empty directory.
WARNING:huggingface_hub.repository:Cloning https://huggingface.co/chenglu/my_awesome_model into local empty directory.
/usr/local/lib/python3.9/dist-packages/transformers/optimization.py:391: FutureWarning: This implementation of AdamW is deprecated and will be removed in a future version. Use the PyTorch implementation torch.optim.AdamW instead, or set `no_deprecation_warning=True` to disable this warning
  warnings.warn(
You're using a DistilBertTokenizerFast tokenizer. Please note that with a fast tokenizer, using the `__call__` method is faster than using a method to encode the text followed by a call to the `pad` method to get a padded encoding.
| Epoch | Training Loss | Validation Loss | Accuracy |
|---|---|---|---|
| 1 | 0.238700 | 0.188998 | 0.927600 |
| 2 | 0.151200 | 0.233457 | 0.93096 |
TrainOutput(global_step=3126, training_loss=0.20756478166244613, metrics={'train_runtime': 3367.9454, 'train_samples_per_second': 14.846, 'train_steps_per_second': 0.928, 'total_flos': 6561288258498624.0, 'train_loss': 0.20756478166244613, 'epoch': 2.0})
训练结束后大家就可以通过 push_to_hub() 方法 上传模型到 Hugging Face 上了,这样所有人都可以看见并且使用你的模型了。
第二步:模型上传到 Hugging Face
trainer.push_to_hub()
remote: Scanning LFS files of refs/heads/main for validity...
remote: LFS file scan complete.
To https://huggingface.co/YOURUSERNAME/my_awesome_model
   beedd7e..07a7f56  main -> main

WARNING:huggingface_hub.repository:remote: Scanning LFS files of refs/heads/main for validity...
remote: LFS file scan complete.
To https://huggingface.co/YOURUSERNAME/my_awesome_model
   beedd7e..07a7f56  main -> main

To https://huggingface.co/YOURUSERNAME/my_awesome_model
   07a7f56..94dee6f  main -> main

WARNING:huggingface_hub.repository:To https://huggingface.co/YOURUSERNAME/my_awesome_model
   07a7f56..94dee6f  main -> main

'https://huggingface.co/YOURUSERNAME/my_awesome_model/commit/07a7f56bd4c32596537816ff2fed565f29468f17'
大家可以在 PyTorch Notebook
或者 TensorFlow Notebook 查看更加详细的关于如何微调模型的教程。
第三步:创建自己的 App
恭喜大家已经获得了自己的模型!下面我们可以在 Hugging Face 中创建一个自己的 App 了。
创建新的 Hugging Face Space 应用
! pip install gradio torch
在 Spaces 主页上点击 Create new Space 。
添加 App 逻辑
在 app.py 文件中接入以下代码:
import gradio as gr
from transformers import pipeline
import torch

id2label = {0: "NEGATIVE", 1: "POSITIVE"}
label2id = {"NEGATIVE": 0, "POSITIVE": 1}

# 导入 HuggingFace 模型 我们刚刚训练好而且上传成功的模型 chjun/my_awesome_model
classifier = pipeline("sentiment-analysis", model="chjun/my_awesome_model")

# input:输入文本
def predict(inputs):
    label_score = classifier(inputs)
    scaled = 0
    if label_score[0]["label"] == "NEGATIVE":
      scaled = 1 - label_score[0]["score"]
    else:
      scaled = label_score[0]["score"]

    # 解码返回值得到输出
    return round(scaled * 5)

with gr.Blocks() as demo:
    review = gr.Textbox(label="用户评论。注:此模型只使用了英文数据 Finetune")
    output = gr.Textbox(label="颗星")
    submit_btn = gr.Button("提交")
    submit_btn.click(fn=predict, inputs=review, outputs=output, api_name="predict")

demo.launch(debug=True)
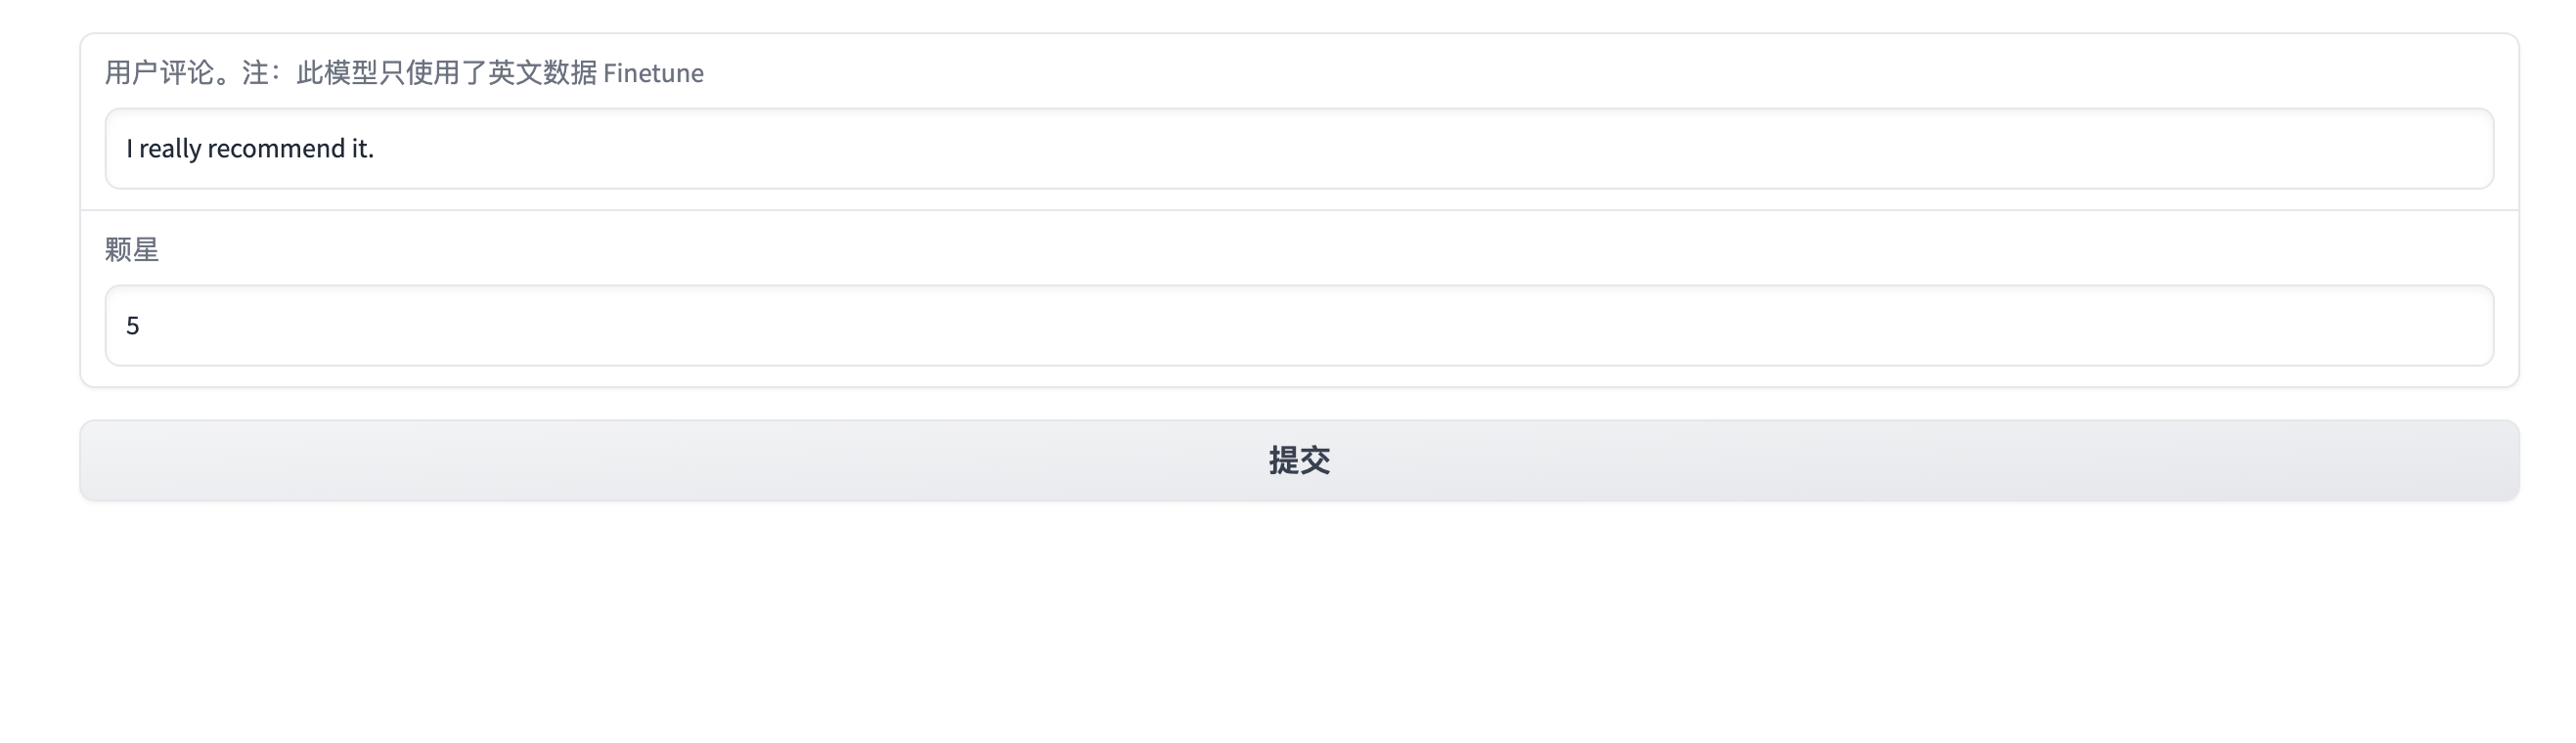
成功运行后,大家应该可以看见下面类似的界面:
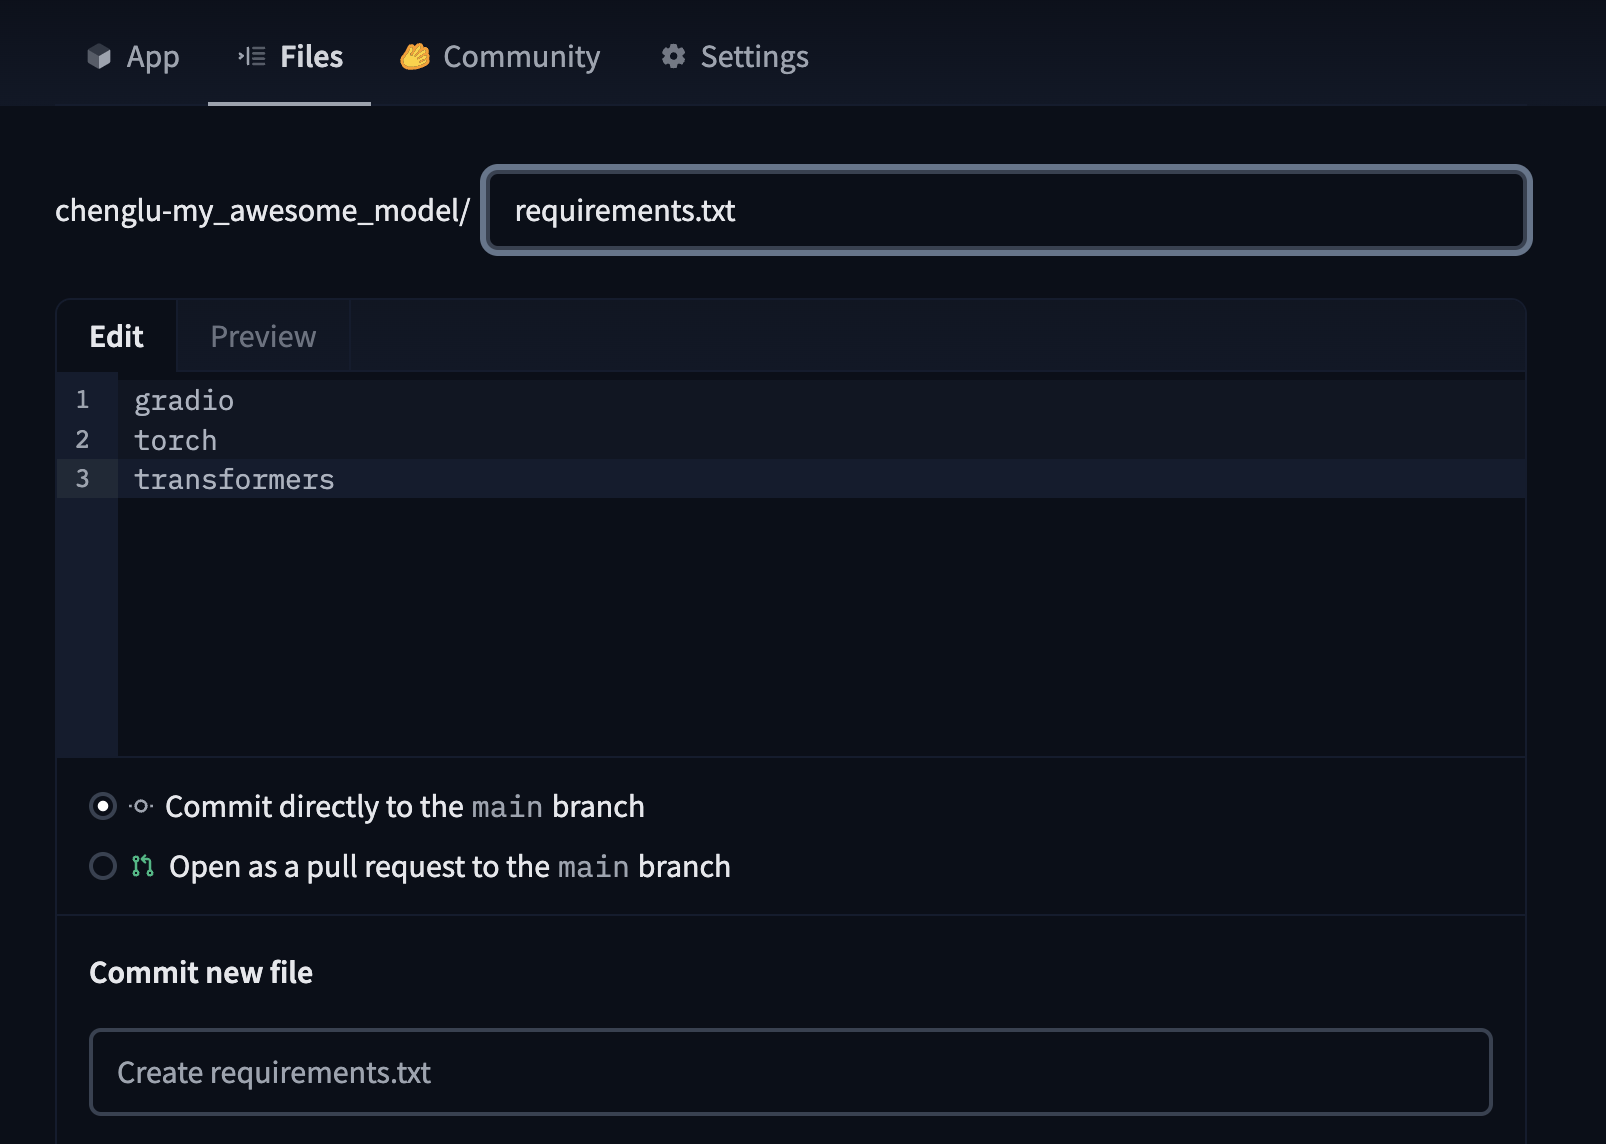
注意,我们需要把必须的库文件放在 requirements.txt 中,例如这个 App 需要:
gradio
torch
transformers
另外,由于我们在示范中只跑了 2 个 epoch,所以最终模型 accuracy 不高。大家可以根据自己的情况调整超参和训练时长。
上传到 Hugging Face Spaces
$git add app.py
$git commit -m "Add application file"
$git push
而且 app.py 以及 requirements.txt 文件,都可以在 Hugging Face Hub 的界面上直接操作,如下图:
第四步: 完成机器人开发
现在,你已经创建了一个能够根据电影评论给电影打分的机器人。当你向机器人提问时,它会使用 Hugging Face 的模型进行情感分析,根据情感分析结果给出一个评分。
chjun/movie_rating_bot 是根据以上教程完成的一个机器人 App,大家也可以直接复制这一个 Space 应用,并在此基础上更改开发。
点击 submit,与你的 AI 伙伴互动吧!这个项目仅仅是一个起点,你可以根据自己的需求和兴趣进一步完善这个聊天机器人,使其具备更多有趣的功能。
第五步: 接入 BaixingAI 机器人广场
还有更激动人心的一步,我们可以把机器人接口根据 BaixingAI 机器人广场需求 扩展,让我们自己创建的机器人可以去和其他机器人交流对话,以下是代码示范:
import gradio as gr
from transformers import pipeline
import torch

# 导入 HuggingFace 模型 我们刚刚训练好而且上传成功的模型 chjun/my_awesome_model
classifier = pipeline("sentiment-analysis", model="chjun/my_awesome_model")

# input:输入文本
def predict(user_review, qid, uid):
    label_score = classifier(user_review)
    scaled = 0
    if label_score[0]["label"] == "NEGATIVE":
      scaled = 1 - label_score[0]["score"]
    else:
      scaled = label_score[0]["score"]

    # 解码返回值得到输出
    return str(round(scaled * 5))

# user_review: 用户评价
# qid:当前消息的唯一标识。例如 `'bxqid-cManAtRMszw...'`。由平台生成并传递给机器人,以便机器人区分单个问题(写日志、追踪调试、异步回调等)。同步调用可忽略。
# uid:用户的唯一标识。例如`'bxuid-Aj8Spso8Xsp...'`。由平台生成并传递给机器人,以便机器人区分用户。可被用于实现多轮对话的功能。
demo = gr.Interface(
    fn=predict,
    inputs=["text","text","text"],
    outputs="text",
  )

demo.launch()
更多详情请参考 Hugging Face baixing Spaces。
未来已来,各位 Hackathon 参赛者们都是探索者,预祝大家一切顺利!