当下,RLHF/ChatGPT 已经变成了一个非常流行的话题。我们正在致力于更多有关 RLHF 的研究,这篇博客尝试复现 OpenAI 在 2019 年开源的原始 RLHF 代码库,其仓库位置位于 openai/lm-human-preferences。尽管它具有 “tensorflow-1.x” 的特性,但 OpenAI 的原始代码库评估和基准测试非常完善,使其成为研究 RLHF 实现工程细节的好地方。
我们的目标是:
- 复现 OAI 在风格化任务中的结果,并匹配 openai/lm-human-preferences 的学习曲线。
- 提供一个实现细节的清单,类似于 近端优化策略的 37 个实施细节 (The 37 Implementation Details of Proximal Policy Optimization) 和 没有痛苦折磨的调试 RL (Debugging RL, Without the Agonizing Pain) 的风格;
- 提供一个易于阅读且简洁的 RLHF 参考实现;
这项工作仅适用于以教育/学习为目的的。对于需要更多功能的高级用户,例如使用 PEFT 运行更大的模型, huggingface/trl 将是一个不错的选择。
-
在 匹配学习曲线 中,我们展示了我们的主要贡献: 创建一个代码库,能够在风格化任务中复现 OAI 的结果,并且与 openai/lm-human-preferences 的学习曲线非常接近地匹配。
-
然后我们深入探讨了与复现 OAI 的工作相关的实现细节。在 总体实现细节 中,我们讨论了基本细节,像如何生成奖励/值和如何生成响应。在 奖励模型实现细节 中,我们讨论了诸如奖励标准化之类的细节。在 策略训练实现细节 中,我们讨论了拒绝采样和奖励“白化”等细节。
- 在 PyTorch Adam 优化器在处理 RLHF 时的数值问题 中,我们强调了 TensorFlow 和 PyTorch 之间 Adam 的一个非常有趣的实现区别,其导致了模型训练中的激进更新。
-
接下来,我们检查了在奖励标签由
gpt2-large生成的情况下,训练不同基础模型 (例如 gpt2-xl, falcon-1b) 的效果。 -
最后,我们通过讨论一些限制来总结我们的研究工作。
以下是一些重要链接:
 我们的复现代码库 https://github.com/vwxyzjn/lm-human-preference-details
 RLHF 模型比较示例: https://huggingface.co/spaces/lm-human-preference-details/rlhf-demo
 所有的 w&b 训练日志 https://wandb.ai/openrlbenchmark/lm_human_preference_details
匹配学习曲线
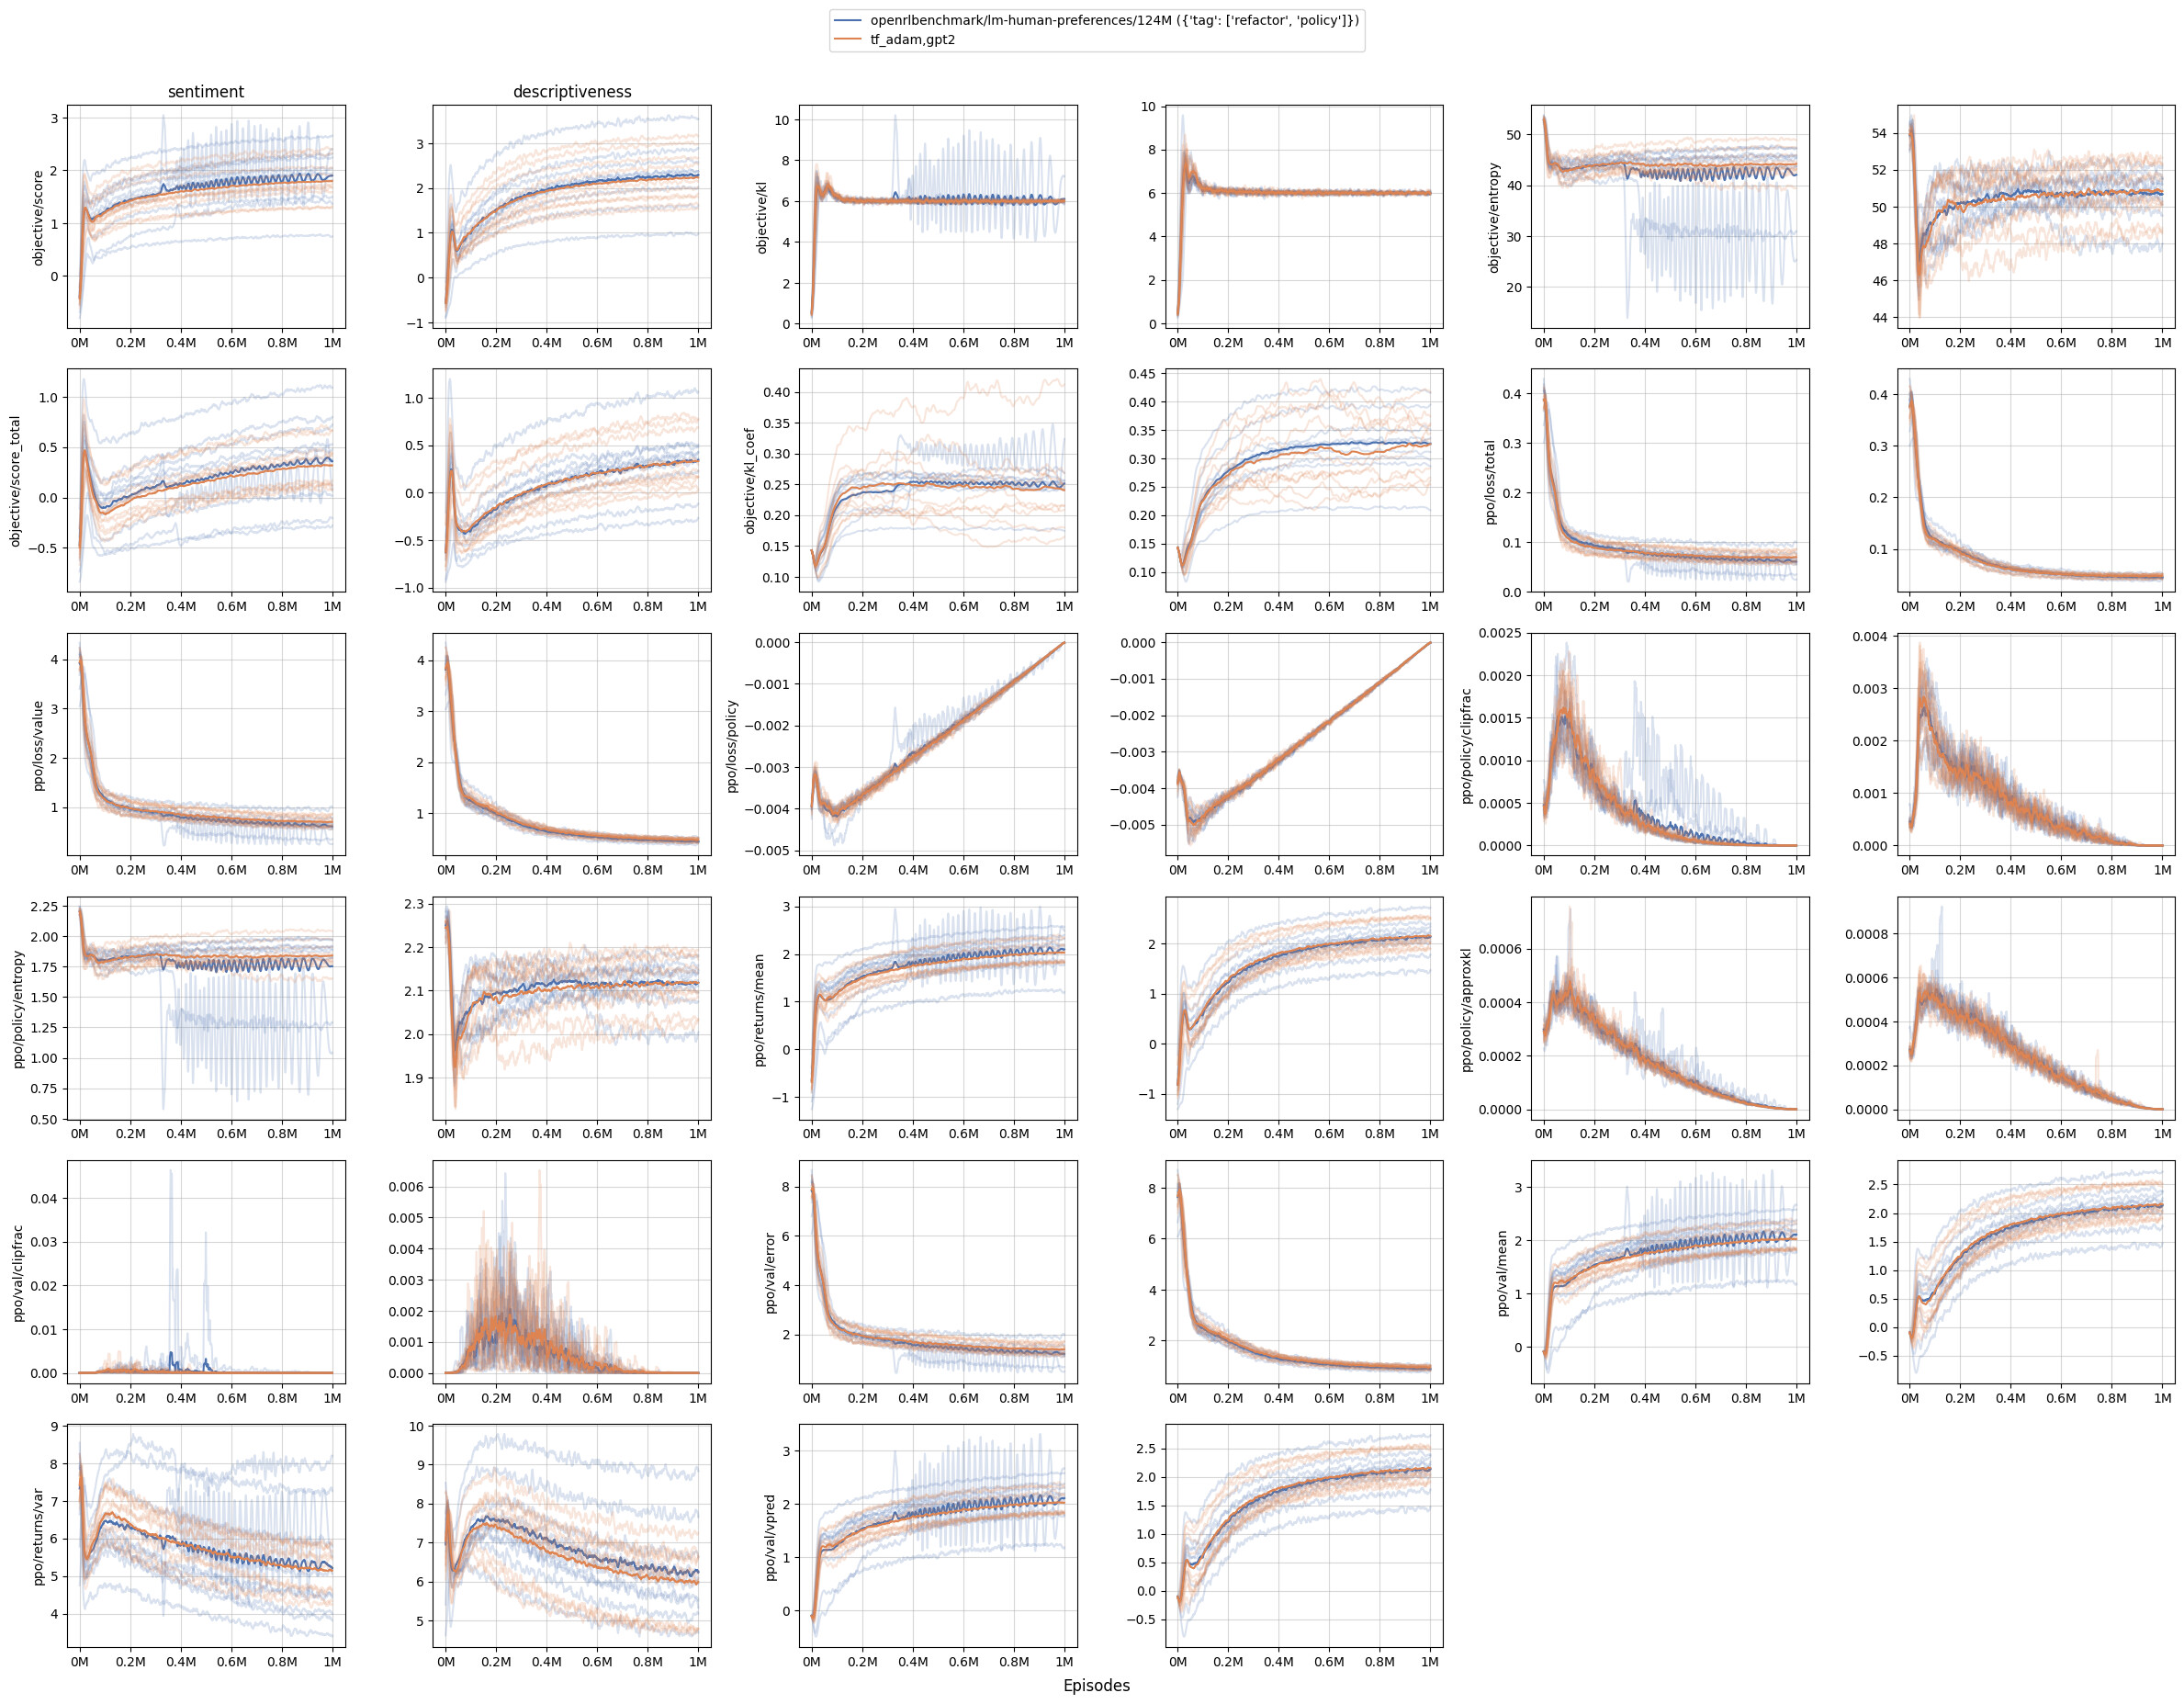
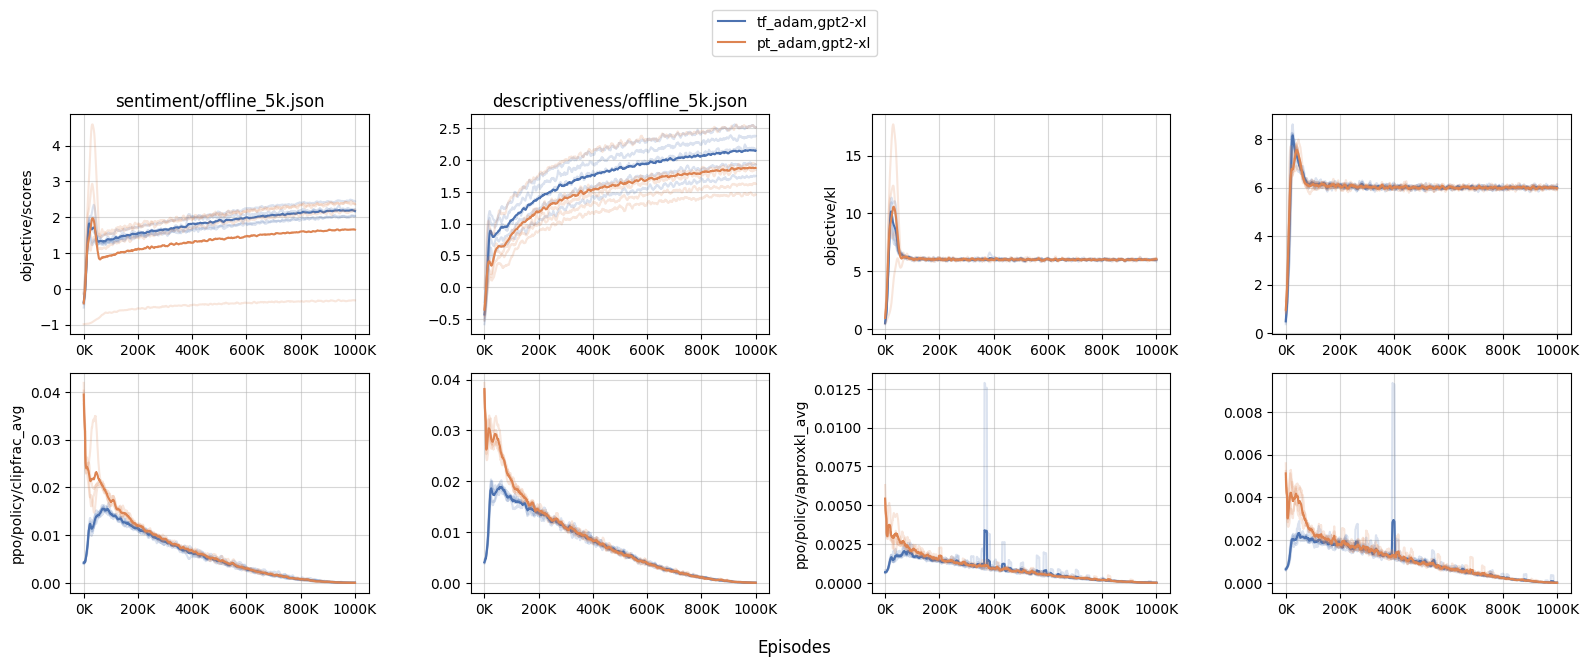
我们的主要贡献是在风格化任务中复现 OAI 的结果,例如情感和描述性。如下图所示,我们的代码库 (橙色曲线) 能够产生与 OAI 的代码库 (蓝色曲线) 几乎相同的学习曲线。
关于运行 openai/lm-human-preferences 的说明
为了直观比较,我们运行了原始的 RLHF 代码,其仓库位置位于 openai/lm-human-preferences,它将提供宝贵的指标,以帮助验证和诊断我们的复现。我们能够设置原始的 TensorFlow 1.x 代码,但它需要一个非常特定的设置:
-
OAI 的数据集部分损坏/丢失 (所以我们用类似的 HF 数据集替换了它们,这可能会或可能不会导致性能差异)
- 具体来说,它的书籍数据集在 OpenAI 的 GCP - Azure 迁移过程中丢失了 (https://github.com/openai/lm-human-preferences/issues/17#issuecomment-1044051496)。我用 Hugging Face 的
bookcorpus数据集替换了书籍数据集,原则上,这是类似 OAI 使用的数据集。
- 具体来说,它的书籍数据集在 OpenAI 的 GCP - Azure 迁移过程中丢失了 (https://github.com/openai/lm-human-preferences/issues/17#issuecomment-1044051496)。我用 Hugging Face 的
-
它不能在 1 个 V100 上运行,因为它没有实现梯度累积。相反,它使用一个大的 BS (批量大小),并在 8 个 GPU 上分割 batch (批量),仅在 1 个 GPU 上就会出现 OOM (内存溢出)。
-
它不能在 8 个 A100 上运行,因为它使用的是 TensorFlow 1.x,与 Cuda 8+ 不兼容。
-
它不能在 8 个 V100 (16GB) 上运行,因为它会 OOM (内存溢出)。
-
它只能在 8 个 V100 (32GB) 上运行,这种配置仅由 AWS 以
p3dn.24xlarge实例的形式提供。
总体实现细节
我们现在深入探讨与复现 OAI 工作相关的技术实现细节。在这个部分,我们讨论了一些基本细节,例如奖励/值是如何生成的,以及响应是如何生成的。以下是这些细节,不按特定顺序列出:
-
奖励模型和策略的价值头将
query和response的连接作为输入- 奖励模型和策略的价值头 不 仅仅查看响应。相反,它将
query和response连接在一起,作为query_response(lm_human_preferences/rewards.py#L105-L107)。 - 举例来说,如果
query = "他在想某事,但他的眼神很难读懂"。,和response = "他看着他的左手,手臂伸在他的前面。",那么奖励模型和策略的价值会对query_response = "他在想某事,但他的眼神很难读懂。他看着他的左手,手臂伸在他的前面。"进行前向传递,并产生形状为(B, T, 1)的奖励和价值,其中B是 BS (批量大小),T是序列长度,而1代表奖励头的输出结构的维度为 1 (lm_human_preferences/rewards.py#L105-L107, lm_human_preferences/policy.py#L111)。 T意味着每个 token 都有与其和前文关联的奖励。例如,eyestoken 将有一个与他在想某事,但他的眼神很难读懂相对应的奖励。
- 奖励模型和策略的价值头 不 仅仅查看响应。相反,它将
-
使用特殊的填充 token 来填充和截断输入。
-
OAI 为查询
query_length设置了固定的输入长度; 它使用pad_token填充 过短的序列 (lm_human_preferences/language/datasets.py#L66-L67),并 截断 过长的序列 (lm_human_preferences/language/datasets.py#L57)。详见 此处 以获取该概念的通用介绍。在填充输入时,OAI 使用了词汇表之外的 token (lm_human_preferences/language/encodings.py#L56)。- 关于 HF 的 transformers — 填充 token 的注解。 根据 (transformers#2630#issuecomment-578159876),在 GPT 和 GPT-2 的预训练期间没有使用填充 token; 因此,transformer 的 gpt2 模型与其分词器没有关联的官方填充 token。通常的做法是设置
tokenizer.pad_token = tokenizer.eos_token,但在这项工作中,我们将区分这两个特殊 token 以匹配 OAI 的原始设置,所以我们将使用tokenizer.add_special_tokens({"pad_token": "[PAD]"})。
注意,没有填充 token 是解码器模型的默认设置,因为它们在预训练期间使用“打包”训练,这意味着许多序列被连接并由 EOS token 分隔,这些序列的块在预训练期间始终具有最大长度并被馈送到模型中。
- 关于 HF 的 transformers — 填充 token 的注解。 根据 (transformers#2630#issuecomment-578159876),在 GPT 和 GPT-2 的预训练期间没有使用填充 token; 因此,transformer 的 gpt2 模型与其分词器没有关联的官方填充 token。通常的做法是设置
-
当把所有事物放在一起时,这里有一个例子
import transformers
tokenizer = transformers.AutoTokenizer.from_pretrained("gpt2", padding_side="right")
tokenizer.add_special_tokens({"pad_token": "[PAD]"})
query_length = 5
texts = [
    "usually, he would",
    "she thought about it",
]
tokens = []
for text in texts:
    tokens.append(tokenizer.encode(text)[:query_length])

print("tokens", tokens)
inputs = tokenizer.pad(
    {"input_ids": tokens},
    padding="max_length",
    max_length=query_length,
    return_tensors="pt",
    return_attention_mask=True,
)
print("inputs", inputs)

"""prints are
tokens [[23073, 11, 339, 561], [7091, 1807, 546, 340]]
inputs {'input_ids': tensor([[23073, 11, 339, 561, 50257],
        [ 7091, 1807, 546, 340, 50257]]), 'attention_mask': tensor([[1, 1, 1, 1, 0],
        [1, 1, 1, 1, 0]])}
"""
-
-
相应地调整填充 token 的位置索引
-
在计算 logits 时,OAI 的代码通过适当地屏蔽填充 token 来工作。这是通过找出与填充 token 相对应的 token 索引来实现的 (lm_human_preferences/language/model.py#L296-L297),然后相应地调整它们的位置索引 (lm_human_preferences/language/model.py#L320)。
-
例如,如果
query=[23073, 50259, 50259]和response=[11, 339, 561],其中 (50259是 OAI 的填充 token),它会创建位置索引为[[0 1 1 1 2 3]]并且如下的 logits。注意填充 token 对应的 logits 如何保持不变!这是我们在复制过程中应该追求的效果。all_logits [[[ -35.28693 -34.2875 -38.16074 ... -41.595802 -41.082108 -35.36577 ] [ -35.28693 -34.2875 -38.16074 ... -41.595802 -41.082108 -35.36577 ] [ -35.28693 -34.2875 -38.16074 ... -41.595802 -41.082108 -35.36577 ] [-111.303955 -110.94471 -112.90624 ... -113.13064 -113.7788 -109.17345 ] [-111.51512 -109.61077 -114.90231 ... -118.43514 -111.56671 -112.12478 ] [-122.69775 -121.84468 -128.27417 ... -132.28055 -130.39604 -125.707756]]] (1, 6, 50257) -
关于 HF 的 transformers —
position_ids和padding_side的注解。 我们可以通过 1) 左填充和 2) 传入适当的position_ids,使用 Hugging Face 的 transformer 复制精确的 logits:import torch import transformers tokenizer = transformers.AutoTokenizer.from_pretrained("gpt2", padding_side="right") tokenizer.add_special_tokens({"pad_token": "[PAD]"}) pad_id = tokenizer.pad_token_id query = torch.tensor([ [pad_id, pad_id, 23073], ]) response = torch.tensor([ [11, 339, 561], ]) temperature = 1.0 query = torch.tensor(query) response = torch.tensor(response).long() context_length = query.shape[1] query_response = torch.cat((query, response), 1) pretrained_model = transformers.AutoModelForCausalLM.from_pretrained("gpt2") def forward(policy, query_responses, tokenizer): attention_mask = query_responses != tokenizer.pad_token_id position_ids = attention_mask.cumsum(1) - attention_mask.long() # exclusive cumsum input_ids = query_responses.clone() input_ids[~attention_mask] = 0 return policy( input_ids=input_ids, attention_mask=attention_mask, position_ids=position_ids, return_dict=True, output_hidden_states=True, ) output = forward(pretrained_model, query_response, tokenizer) logits = output.logits logits /= temperature print(logits) """ tensor([[[ -26.9395, -26.4709, -30.0456, ..., -33.2208, -33.2884, -27.4360], [ -27.1677, -26.7330, -30.2386, ..., -33.6813, -33.6931, -27.5928], [ -35.2869, -34.2875, -38.1608, ..., -41.5958, -41.0821, -35.3658], [-111.3040, -110.9447, -112.9062, ..., -113.1306, -113.7788, -109.1734], [-111.5152, -109.6108, -114.9024, ..., -118.4352, -111.5668, -112.1248], [-122.6978, -121.8447, -128.2742, ..., -132.2805, -130.3961, -125.7078]]], grad_fn=<DivBackward0>) """ -
关于 HF 的 transformers ——在
生成过程中的position_ids的注解: 在生成过程中,我们不应传入position_ids,因为在transformers中,position_ids已经以某种方式被调整了。当我在生成过程中也传入position_ids时,性能会灾难性地恶化。
通常情况下,我们几乎从不在 transformers 中传递
position_ids。所有的遮蔽 (masking) 和移位 (shifting) logic 已经实现,例如,在generate函数中 (需要永久的代码链接)。 -
-
生成固定长度响应的响应生成不需要填充。
-
在响应生成期间,OAI 使用
top_k=0, top_p=1.0并仅在词汇表上做分类样本 (lm_human_preferences/language/sample.py#L43),代码会一直采样,直到生成固定长度的响应 (lm_human_preferences/policy.py#L103)。值得注意的是,即使遇到 EOS (序列结束) token ,它也会继续采样。 -
关于 HF 的 transformers 的注解 — 在
eos_token处采样可能会停止: 在transformers中,生成可能会在eos_token处停止 (src/transformers/generation/utils.py#L2248-L2256),这与 OAI 的设置不同。为了对齐设置,我们需要设置pretrained_model.generation_config.eos_token_id = None, pretrained_model.generation_config.pad_token_id = None。请注意,transformers.GenerationConfig(eos_token_id=None, pad_token_id=None, ...)不起作用,因为pretrained_model.generation_config会覆盖并设置一个eos_token。import torch import transformers tokenizer = transformers.AutoTokenizer.from_pretrained("gpt2", padding_side="right") tokenizer.add_special_tokens({"pad_token": "[PAD]"}) pad_id = tokenizer.pad_token_id query = torch.tensor([ [pad_id, pad_id, 23073], ]) response = torch.tensor([ [11, 339, 561], ]) response_length = 4 temperature = 0.7 pretrained_model = transformers.AutoModelForCausalLM.from_pretrained("gpt2") pretrained_model.generation_config.eos_token_id = None # disable `pad_token_id` and `eos_token_id` because we just want to pretrained_model.generation_config.pad_token_id = None # generate tokens without truncation / padding generation_config = transformers.GenerationConfig( max_new_tokens=response_length, min_new_tokens=response_length, temperature=temperature, top_k=0.0, top_p=1.0, do_sample=True, ) context_length = query.shape[1] attention_mask = query != tokenizer.pad_token_id input_ids = query.clone() input_ids[~attention_mask] = 0 # set padding tokens to 0 output = pretrained_model.generate( input_ids=input_ids, attention_mask=attention_mask, # position_ids=attention_mask.cumsum(1) - attention_mask.long(), # generation collapsed if this was turned on. TODO: why does generation collapse with this? generation_config=generation_config, return_dict_in_generate=True, ) print(output.sequences) """ tensor([[ 0, 0, 23073, 16851, 11, 475, 991]]) """ -
请注意,在较新的代码库 GitHub - openai/summarize-from-feedback: Code for "Learning to summarize from human feedback" 中,当遇到 EOS token 时,OAI 确实会停止采样 (summarize_from_feedback/utils/experiment_helpers.py#L19)。然而,在这项工作中,我们的目标是进行 1:1 的复刻,所以我们调整了设置,即使遇到 eos_token 也可以继续采样。
-
-
奖励模型和策略训练的学习率退火。
- 正如 Ziegler 等人 (2019) 建议的,奖励模型只训练一个 epcho,以避免过度拟合有限量的人类注释数据 (例如,
descriptiveness任务只有大约 5000 个标签)。在这个单一的 epcho 中,学习率会退火至零 (lm_human_preferences/train_reward.py#L249)。 - 类似于奖励模型训练,策略训练的学习率也会退火至零 (lm_human_preferences/train_policy.py#L172-L173)。
- 正如 Ziegler 等人 (2019) 建议的,奖励模型只训练一个 epcho,以避免过度拟合有限量的人类注释数据 (例如,
-
为不同的进程使用不同的种子
-
在生成 8 个 GPU 进程进行数据并行时,OAI 为每个进程设置了不同的随机种子 (lm_human_preferences/utils/core.py#L108-L111)。在实现上,这是通过
local_seed = args.seed + process_rank * 100003完成的。种子会让模型产生不同的响应并得到不同的分数,例如。- 注: 我认为数据集的洗牌 (shuffling) 存在一个错误——由于某种原因,数据集是使用相同的种子进行洗牌的 (lm_human_preferences/lm_tasks.py#L94-L97)。
-
奖励模型实现细节
在本节中,我们讨论了奖励模型特定的实现细节。我们讨论了诸如奖励归一化和层初始化等细节。以下是这些细节,不按特定顺序排列:
-
奖励模型只输出最后一个 token 的值。
- 请注意,在对
query和response的连接进行前向传递后获得的奖励将具有形状(B, T, 1),其中B是 BS(批量大小),T是序列长度 (始终相同; 在 OAI 的设置中,它是query_length + response_length = 64 + 24 = 88,用于风格任务,参见 launch.py#L9-L11),1是奖励头其维度为 1。对于 RLHF (Reinforcement Learning from Human Feedback,通过人类反馈进行强化学习) 的目的,原始代码库提取最后一个 token 的奖励 (lm_human_preferences/rewards.py#L132),因此奖励将只具有形状(B, 1)。 - 请注意,在较新的代码库 openai/summarize-from-feedback 中,OAI 在遇到 EOS token 时停止采样 (summarize_from_feedback/utils/experiment_helpers.py#L19)。在提取奖励时,它将确定
last_response_index,即 EOS token 之前的索引 (#L11-L13),并在该索引处提取奖励 (summarize_from_feedback/reward_model.py#L59)。但在此工作中,我们只是坚持原始设置。
- 请注意,在对
-
奖励头层初始化
- 奖励头的权重是根据 \mathcal{N}\left(0,1 /\left(\sqrt{d_{\text {model }}+1}\right)\right) 初始化的 (lm_human_preferences/language/model.py#L368, lm_human_preferences/language/model.py#L251-L252)。这与 Stiennon 等人的设置相符,2020 年 (summarize_from_feedback/query_response_model.py#L106-L107) (附注,Stiennon 等人,2020 年在第 17 页上有一个错字,表示分布是 \mathcal{N}\left(0,1 /\left(d_{\text {model }}+1\right)\right) 没有平方根)
- 奖励头的 bias (偏置) 设为 0 (lm_human_preferences/language/model.py#L254)。
-
奖励模型的前后归一化
-
在论文中,Ziegler 等人 (2019) 提到“为了保持训练过程中奖励模型的规模一致,我们将其归一化,使其在 x \sim \mathcal{D}, y \sim \rho(·|x) 的情况下,均值为 0,方差为 1”。为了执行归一化过程,代码首先创建了
reward_gain和reward_bias,以便可以通过reward = reward * reward_gain + reward_bias来计算奖励值 (lm_human_preferences/rewards.py#L50-L51)。 -
在执行归一化过程时,代码首先设置
reward_gain=1, reward_bias=0(lm_human_preferences/train_reward.py#L211),然后从目标数据集 (例如,bookcorpus, tldr, cnndm) 中收集采样查询、完成的响应和评估的奖励。接着,它得到评估奖励的 实证均值和标准差 (lm_human_preferences/train_reward.py#L162-L167),并尝试计算reward_gain和reward_bias应该是什么。 -
我们用 \mu_{\mathcal{D}} 来表示实证均值,用 \sigma_{\mathcal{D}} 表示实证标准差,用 g 表示
reward_gain,用 b 表示reward_bias,用$ \mu_{\mathcal{T}} = 0$ 表示 目标均值,用 \sigma_{\mathcal{T}}=1 表示 目标标准差。然后我们有以下公式。\begin{aligned}g*\mathcal{N}(\mu_{\mathcal{D}}, \sigma_{\mathcal{D}}) + b &= \mathcal{N}(g*\mu_{\mathcal{D}}, g*\sigma_{\mathcal{D}}) + b\\&= \mathcal{N}(g*\mu_{\mathcal{D}} + b, g*\sigma_{\mathcal{D}}) \\&= \mathcal{N}(\mu_{\mathcal{T}}, \sigma_{\mathcal{T}}) \\g &= \frac{\sigma_{\mathcal{T}}}{\sigma_{\mathcal{D}}} \\b &= \mu_{\mathcal{T}} - g*\mu_{\mathcal{D}}\end{aligned}
-
然后在奖励模型训练的 前 和 后 应用归一化过程 (lm_human_preferences/train_reward.py#L232-L234,lm_human_preferences/train_reward.py#L252-L254)。
-
请注意,我们为归一化目的生成的响应 y \sim \rho(·|x) 来自预训练的语言模型 $\rho 。模型 \rho $ 被固定为参考,并且在奖励学习中不会更新 (lm_human_preferences/train_reward.py#L286C1-L286C31)。
-
策略训练实现细节
在本节中,我们将深入探讨诸如层初始化、数据后处理和 dropout 设置等细节。我们还将探讨一些技术,如拒绝采样和奖励 “白化”,以及自适应 KL。以下是这些细节,排列不分先后:
-
通过采样温度来缩放 logits
- 在计算响应的对数概率时,模型首先输出响应中 token 的 logits,然后用采样温度除以这些 logits (lm_human_preferences/policy.py#L121)。即
logits /= self.temperature - 在一个非正式的测试中,我们发现如果不进行此缩放,KL 散度会比预期更快地上升,性能会下降。
- 在计算响应的对数概率时,模型首先输出响应中 token 的 logits,然后用采样温度除以这些 logits (lm_human_preferences/policy.py#L121)。即
-
价值头层的初始化
- 价值头的权重是根据 \mathcal{N}(0,0) 进行初始化的 (lm_human_preferences/language/model.py#L368、lm_human_preferences/language/model.py#L251-L252)。
- 奖励头的 bias (偏置) 设置为 0 (lm_human_preferences/language/model.py#L254)。
-
选择以句号开始和结束的查询文本
-
这是数据预处理的一部分:
- 尝试仅在
start_text="."之后选择文本 (lm_human_preferences/language/datasets.py#L51) - 尝试在
end_text="."之前选择文本 (lm_human_preferences/language/datasets.py#L61) - 然后填充文本 (lm_human_preferences/language/datasets.py#L66-L67)
- 尝试仅在
-
在运行
openai/lm-human-preferences时,OAI 的数据集部分损坏/丢失 (openai/lm-human-preferences/issues/17#issuecomment-104405149),因此我们不得不用类似的 HF 数据集替换它们,这可能会或可能不会导致性能差异。 -
对于书籍数据集,我们使用 https://huggingface.co/datasets/bookcorpus,我们发现没有必要提取以句号开始和结束的句子,因为数据集已经是这样预处理过的 (例如,
"usually , he would be tearing around the living room , playing with his toys.") 为此,我们为sentiment和descriptiveness任务设置start_text=None, end_text=None。
-
-
禁用 dropout
- Ziegler 等人 (2019) 建议,“我们在策略训练中不使用 dropout。” 这也在代码中实现了 (lm_human_preferences/policy.py#L48)。
-
拒绝采样
- Ziegler 等人 (2019) 建议: “我们使用拒绝采样来确保在第 16 和 24 个 token 之间有一个句号,然后在那个句号处截断 (这是‘句子结束’的粗略近似。我们选择它是因为它很容易集成到 RL 循环中,即使是粗略的近似也足以使人类评估任务变得稍微容易一些)。在 RL 微调期间,我们对没有这样的句号的延续给予固定奖励 -1。”
- 具体来说,通过以下步骤实现此目的:
-
token 截断: 我们想要在第一个出现在响应的
truncate_after位置之后的truncate_token处截断 (lm_human_preferences/train_policy.py#L378)。- 代码注释: “中心示例: 将截断 token 后的所有 token 替换为填充 token”
-
在截断响应上运行奖励模型: 在 token 截断过程将响应截断后,代码然后在 截断的响应 上运行奖励模型。
-
拒绝采样: 如果在第 16 和 24 个 token 之间没有句号,那么将响应的分数替换为固定的低值 (例如 -1) (lm_human_preferences/train_policy.py#L384、lm_human_preferences/train_policy.py#L384-L402)。
- 代码注释: “中心示例: 确保样本包含
truncate_token“ - 代码注释: “只对通过该功能的响应进行人类查询”
- 代码注释: “中心示例: 确保样本包含
-
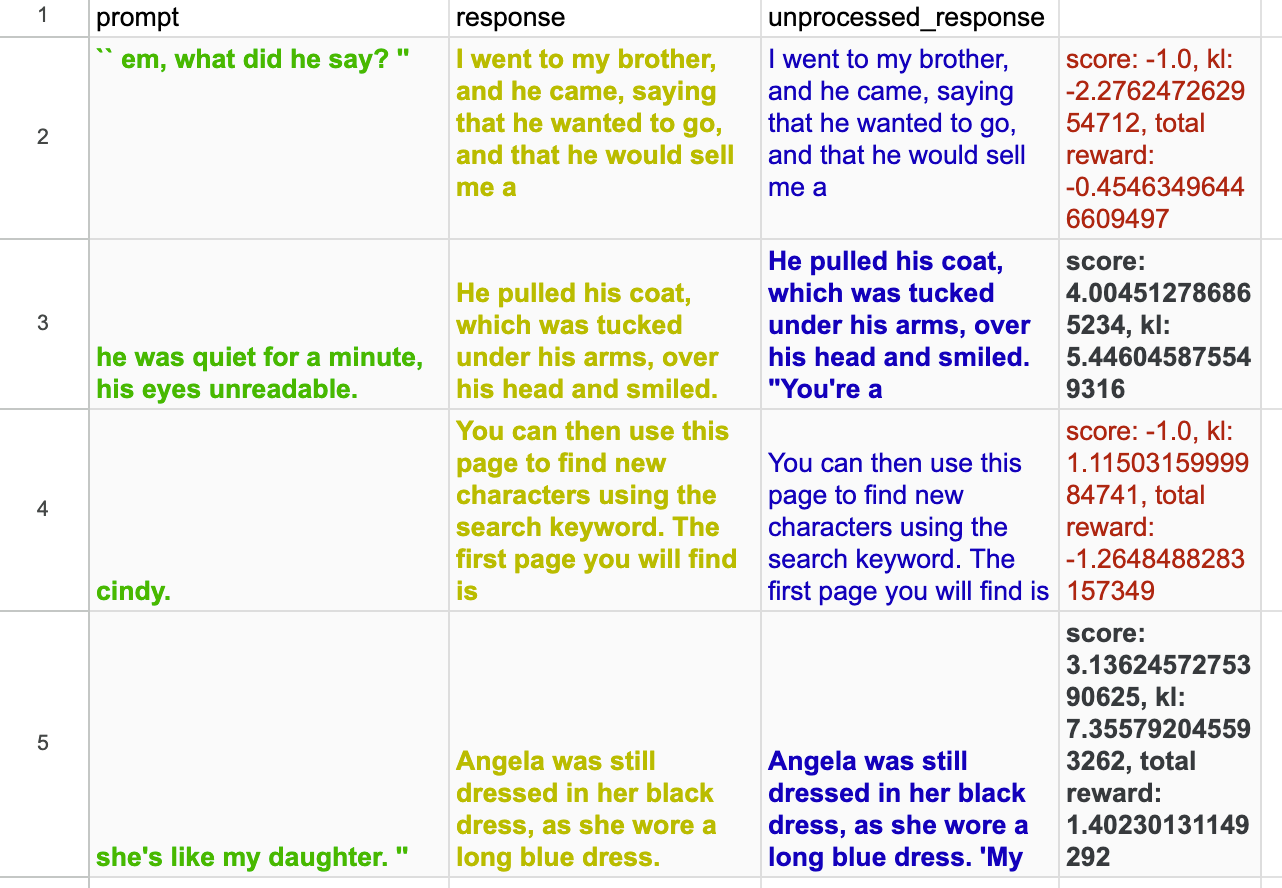
在
descriptiveness中举一些例子:从我们的复制中提取的样本 https://wandb.ai/openrlbenchmark/lm_human_preference_details/runs/djf8yymv/logs。请注意,第 1 和第 3 个示例在句号后有太多 token,因此其分数被替换为 -1。
-
-
折现因子 (discount factor) = 1
- 折现因子 \gamma 设置为 1 (lm_human_preferences/train_policy.py#L56),这意味着未来的奖励与即时奖励具有相同的权重。
-
训练循环的术语: PPO 中的批次和小批次
-
OAI 使用以下训练循环 (lm_human_preferences/train_policy.py#L184-L192)。注意: 我们额外添加了
micro_batch_size来帮助处理梯度累积的情况。在每个时期,它都会洗牌批次索引。import numpy as np batch_size = 8 nminibatches = 2 gradient_accumulation_steps = 2 mini_batch_size = batch_size // nminibatches micro_batch_size = mini_batch_size // gradient_accumulation_steps data = np.arange(batch_size).astype(np.float32) print("data:", data) print("batch_size:", batch_size) print("mini_batch_size:", mini_batch_size) print("micro_batch_size:", micro_batch_size) for epoch in range(4): batch_inds = np.random.permutation(batch_size) print("epoch:", epoch, "batch_inds:", batch_inds) for mini_batch_start in range(0, batch_size, mini_batch_size): mini_batch_end = mini_batch_start + mini_batch_size mini_batch_inds = batch_inds[mini_batch_start:mini_batch_end] # `optimizer.zero_grad()` set optimizer to zero for gradient accumulation for micro_batch_start in range(0, mini_batch_size, micro_batch_size): micro_batch_end = micro_batch_start + micro_batch_size micro_batch_inds = mini_batch_inds[micro_batch_start:micro_batch_end] print("____⏩ a forward pass on", data[micro_batch_inds]) # `optimizer.step()` print("⏪ a backward pass on", data[mini_batch_inds]) # data: [0. 1. 2. 3. 4. 5. 6. 7.] # batch_size: 8 # mini_batch_size: 4 # micro_batch_size: 2 # epoch: 0 batch_inds: [6 4 0 7 3 5 1 2] # ____⏩ a forward pass on [6. 4.] # ____⏩ a forward pass on [0. 7.] # ⏪ a backward pass on [6. 4. 0. 7.] # ____⏩ a forward pass on [3. 5.] # ____⏩ a forward pass on [1. 2.] # ⏪ a backward pass on [3. 5. 1. 2.] # epoch: 1 batch_inds: [6 7 3 2 0 4 5 1] # ____⏩ a forward pass on [6. 7.] # ____⏩ a forward pass on [3. 2.] # ⏪ a backward pass on [6. 7. 3. 2.] # ____⏩ a forward pass on [0. 4.] # ____⏩ a forward pass on [5. 1.] # ⏪ a backward pass on [0. 4. 5. 1.] # epoch: 2 batch_inds: [1 4 5 6 0 7 3 2] # ____⏩ a forward pass on [1. 4.] # ____⏩ a forward pass on [5. 6.] # ⏪ a backward pass on [1. 4. 5. 6.] # ____⏩ a forward pass on [0. 7.] # ____⏩ a forward pass on [3. 2.] # ⏪ a backward pass on [0. 7. 3. 2.] # epoch: 3 batch_inds: [7 2 4 1 3 0 6 5] # ____⏩ a forward pass on [7. 2.] # ____⏩ a forward pass on [4. 1.] # ⏪ a backward pass on [7. 2. 4. 1.] # ____⏩ a forward pass on [3. 0.] # ____⏩ a forward pass on [6. 5.] # ⏪ a backward pass on [3. 0. 6. 5.]
-
-
基于每个标记的 KL 惩罚
-
代码为奖励添加了每个标记的 KL 惩罚 (lm_human_preferences/train_policy.py#L150-L153),以阻止策略与原始策略差异过大。
-
以 “usually, he would” 为例,它被标记化为
[23073, 11, 339, 561]。假设我们使用[23073]作为查询,[11, 339, 561]作为响应。然后在默认的gpt2参数下,响应标记将具有参考策略的对数概率logprobs=[-3.3213, -4.9980, -3.8690]。- 在第一个 PPO 更新时期和小批次更新时,激活策略将具有相同的对数概率
new_logprobs=[-3.3213, -4.9980, -3.8690]。因此,每个标记的 KL 惩罚将为kl = new_logprobs - logprobs = [0., 0., 0.]。 - 但是,在第一个梯度反向传播后,我们可能会得到
new_logprob=[3.3213, -4.9980, -3.8690],因此每个标记的 KL 惩罚变为kl = new_logprobs - logprobs = [-0.3315, -0.0426, 0.6351]。 - 随后,
non_score_reward = beta * kl,其中beta是 KL 惩罚系数 $beta$,它被添加到从奖励模型获得的score中,以创建用于训练的rewards。score仅在每个回合 ( episode ) 结束时给出,可能类似于[0.4],然后我们有rewards = [beta * -0.3315, beta * -0.0426, beta * 0.6351 + 0.4]。
- 在第一个 PPO 更新时期和小批次更新时,激活策略将具有相同的对数概率
-
-
每个小批次的奖励和优势白化,可选择均值平移
-
OAI 实现了一个名为
whiten的函数,如下所示,基本上通过减去其均值然后除以其标准差来对values进行归一化。可选地,whiten可以通过shift_mean=True将白化后的values平移到均值。def whiten(values, shift_mean=True): mean, var = torch.mean(values), torch.var(values, unbiased=False) whitened = (values - mean)* torch.rsqrt(var + 1e-8) if not shift_mean: whitened += mean return whitened -
在每个小批次中,OAI 使用
whiten(rewards, shift_mean=False)对奖励进行白化,不对均值进行平移处理 (lm_human_preferences/train_policy.py#L325),并使用平移后的均值对优势进行白化whiten(advantages)(lm_human_preferences/train_policy.py#L338)。 -
优化注意事项: 如果小批次的数量为一 (在此复现中是这种情况),我们只需要对奖励进行白化、计算并对优势进行一次白化,因为它们的值不会改变。
-
TensorFlow vs PyTorch 注意事项:
tf.moments与torch.var的不同行为: 由于方差计算方式不同,Torch 和 TensorFlow 中的白化行为不同:import numpy as np import tensorflow as tf import torch def whiten_tf(values, shift_mean=True): mean, var = tf.nn.moments(values, axes=list(range(values.shape.rank))) mean = tf.Print(mean, [mean], 'mean', summarize=100) var = tf.Print(var, [var], 'var', summarize=100) whitened = (values - mean)* tf.rsqrt(var + 1e-8) if not shift_mean: whitened += mean return whitened def whiten_pt(values, shift_mean=True, unbiased=True): mean, var = torch.mean(values), torch.var(values, unbiased=unbiased) print("mean", mean) print("var", var) whitened = (values - mean)* torch.rsqrt(var + 1e-8) if not shift_mean: whitened += mean return whitened rewards = np.array([ [1.2, 1.3, 1.4], [1.5, 1.6, 1.7], [1.8, 1.9, 2.0], ]) with tf.Session() as sess: print(sess.run(whiten_tf(tf.constant(rewards, dtype=tf.float32), shift_mean=False))) print(whiten_pt(torch.tensor(rewards), shift_mean=False, unbiased=True)) print(whiten_pt(torch.tensor(rewards), shift_mean=False, unbiased=False))mean[1.5999999] var[0.0666666627] [[0.05080712 0.4381051 0.8254035 ] [1.2127019 1.6000004 1.9872988 ] [2.3745968 2.7618952 3.1491938 ]] mean tensor(1.6000, dtype=torch.float64) var tensor(0.0750, dtype=torch.float64) tensor([[0.1394, 0.5046, 0.8697], [1.2349, 1.6000, 1.9651], [2.3303, 2.6954, 3.0606]], dtype=torch.float64) mean tensor(1.6000, dtype=torch.float64) var tensor(0.0667, dtype=torch.float64) tensor([[0.0508, 0.4381, 0.8254], [1.2127, 1.6000, 1.9873], [2.3746, 2.7619, 3.1492]], dtype=torch.float64)
-
-
裁剪值函数
- 与原始的 PPO 一样 (baselines/ppo2/model.py#L68-L75),值函数被裁剪 (lm_human_preferences/train_policy.py#L343-L348),方式与策略目标类似。
-
自适应 KL 散度
-
KL 散度惩罚系数 \beta 根据当前策略与先前策略之间的 KL 散度自适应修改。如果 KL 散度超出预定的目标范围,则调整惩罚系数以使其更接近目标范围 (lm_human_preferences/train_policy.py#L115-L124)。它的实现如下:
class AdaptiveKLController: def __init__(self, init_kl_coef, hparams): self.value = init_kl_coef self.hparams = hparams def update(self, current, n_steps): target = self.hparams.target proportional_error = np.clip(current / target - 1, -0.2, 0.2) mult = 1 + proportional_error * n_steps / self.hparams.horizon self.value *= mult -
对于本工作中研究的
sentiment和descriptiveness任务,我们使用了init_kl_coef=0.15, hparams.target=6, hparams.horizon=10000。
-
PyTorch Adam 优化器与 RLHF 相关的数值问题
-
这个实现细节非常有趣,值得专门一节来讨论。
-
PyTorch 的 Adam 优化器 (torch.optim.Adam.html) 与 TensorFlow 的 Adam 优化器 (TF1 Adam 在 tensorflow/v1.15.2/adam.py,TF2 Adam 在 keras/adam.py#L26-L220) 有不同的实现方式。具体来说, PyTorch 遵循了 Kingma 和 Ba 的 Adam 论文中的算法 1 (arxiv/1412.6980),而 TensorFlow 使用了该论文第 2.1 节前的公式,这里提到的
epsilon在论文中称为epsilon hat。在伪代码比较中,我们有以下内容:### pytorch adam implementation: bias_correction1 = 1 - beta1 ** step bias_correction2 = 1 - beta2 ** step step_size = lr / bias_correction1 bias_correction2_sqrt = _dispatch_sqrt(bias_correction2) denom = (exp_avg_sq.sqrt() / bias_correction2_sqrt).add_(eps) param.addcdiv_(exp_avg, denom, value=-step_size) ### tensorflow adam implementation: lr_t = lr * _dispatch_sqrt((1 - beta2 ** step)) / (1 - beta1 ** step) denom = exp_avg_sq.sqrt().add_(eps) param.addcdiv_(exp_avg, denom, value=-lr_t) -
让我们比较一下 PyTorch 风格和 TensorFlow 风格 Adam 的更新方程。按照 Adam 论文 (Kingma 和 Ba,2014) 的符号表示,我们可以得到 PyTorch Adam (Kingma 和 Ba 论文的算法 1) 和 TensorFlow 风格 Adam (Kingma 和 Ba 论文第 2.1 节前的公式) 的梯度更新规则如下:
\begin{aligned}\text{pytorch adam :}\quad \theta_t & =\theta_{t-1}-\alpha \cdot \hat{m} _t /\left(\sqrt{\hat{v} _t}+\varepsilon\right) \& =\theta_ {t-1}- \alpha \underbrace{\left[m_t /\left(1-\beta_1^t\right)\right]}_ {=\hat{m} _t} /\left[\sqrt{\underbrace{v_t /\left(1-\beta_2^t\right)}_ {=\hat{v} _t} }+\varepsilon\right]\& =\theta_ {t-1}- \alpha\left[m_t /\left(1-\beta_1^t\right)\right]\frac{\sqrt{1-\beta_2^t}}{\sqrt{v_t}+\color{green}{\varepsilon \sqrt{1-\beta_2^t}}}\end{aligned}
\begin{aligned}\text{tensorflow adam:}\quad \theta_t & =\theta_{t-1}-\alpha_t m_t /\left(\sqrt{v_t}+\hat{\varepsilon}\right) \& =\theta_{t-1}-\underbrace{\left[\alpha \sqrt{1-\beta_2^t} /\left(1-\beta_1^t\right)\right]} _{=\alpha_t} m_t /\left(\sqrt{v_t}+\hat{\varepsilon}\right) \& =\theta_ {t-1}- \alpha\left[m_t /\left(1-\beta_1^t\right)\right] \frac{\sqrt{1-\beta_2^t}}{\sqrt{v_t}+\color{green}{\hat{\varepsilon}}} \end{aligned}
- 上面的方程强调了 PyTorch 和 TensorFlow 实现之间的区别在于它们的 归一化项,即 \color{green}{\varepsilon \sqrt{1-\beta_2^t}} 和 $\color{green}{\hat{\varepsilon}}。如果我们设置 \hat{\varepsilon} = \varepsilon \sqrt{1-\beta_2^t},则这两个版本是等价的。然而,在 PyTorch 和 TensorFlow 的 API 中,我们只能通过 `eps` 参数设置 \varepsilon$ (PyTorch) 和 \hat{\varepsilon} (TensorFlow),从而导致它们的更新方程存在差异。如果我们将 \varepsilon 和 hat{\varepsilon} 都设置为相同的值,比如 1e-5 会发生什么?那么对于 TensorFlow Adam,归一化项 \hat{\varepsilon} = \text{1e-5} 就是一个常数。但对于 PyTorch Adam,归一化项 {\varepsilon \sqrt{1-\beta_2^t}} 随着时间的推移而变化。重要的是,当时间步 t 较小时,该项 {\varepsilon \sqrt{1-\beta_2^t}} 明显小于 1e-5,随着时间步增加,逐渐接近 1e-5。下面的图表比较了这两个归一化项随着时间步的变化情况:
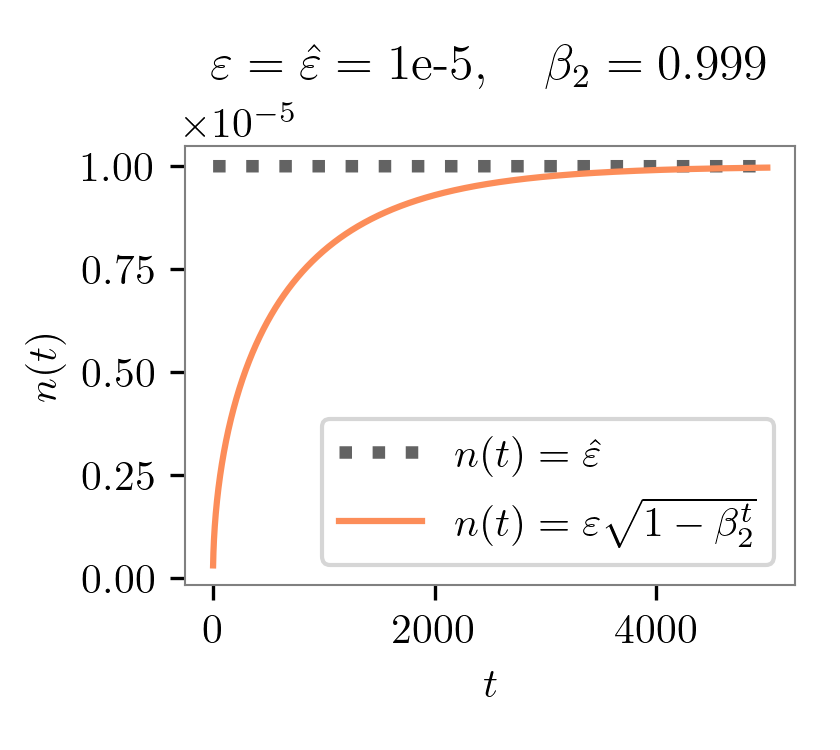
- 上图显示,如果我们在 PyTorch Adam 和 TensorFlow Adam 中设置相同的
eps,那么在训练的早期阶段,PyTorch Adam 使用的归一化项要比 TensorFlow Adam 小得多。换句话说,PyTorch Adam 在训练的早期采用了 更激进的梯度更新。我们的实验证明了这一发现,如下所示。 - 这对复现性和性能有何影响?为了保持设置一致,我们记录了来自 https://github.com/openai/lm-human-preferences 的原始查询、响应和奖励,并将它们保存在 https://huggingface.co/datasets/vwxyzjn/lm-human-preferences-debug/tree/main 中。我还记录了使用 TF1 的
AdamOptimizer优化器的前两个训练周期的指标作为基准。以下是一些关键指标:
| OAI 的 TF1 Adam | PyTorch 的 Adam | 我们自定义的类似 TensorFlow 风格的 Adam | |
|---|---|---|---|
| policy/approxkl | 0.00037167023 | 0.0023672834504395723 | 0.000374998344341293 |
| policy/clipfrac | 0.0045572915 | 0.02018229104578495 | 0.0052083334885537624 |
| ratio_mean | 1.0051285 | 1.0105520486831665 | 1.0044583082199097 |
| ratio_var | 0.0007716546 | 0.005374275613576174 | 0.0007942612282931805 |
| ratio_max | 1.227216 | 1.8121057748794556 | 1.250215768814087 |
| ratio_min | 0.7400441 | 0.4011387825012207 | 0.7299948930740356 |
| logprob_diff_mean | 0.0047487603 | 0.008101251907646656 | 0.004073789343237877 |
| logprob_diff_var | 0.0007207897 | 0.004668936599045992 | 0.0007334011606872082 |
| logprob_diff_max | 0.20474821 | 0.594489574432373 | 0.22331619262695312 |
| logprob_diff_min | -0.30104542 | -0.9134478569030762 | -0.31471776962280273 |
-
由于某种原因, PyTorch 的 Adam 生成了更激进的更新。以下是一些证据:
- PyTorch 的 Adam 的 logprob_diff_var 高出 6 倍。这里的
logprobs_diff = new_logprobs - logprobs是经过两个训练周期后,初始策略和当前策略之间的标记对数概率差异。具有更大的logprob_diff_var意味着对数概率变化的幅度比 OAI 的 TF1 Adam 大。 - PyTorch 的 Adam 呈现更极端的最大和最小比率。这里的
ratio = torch.exp(logprobs_diff)。具有ratio_max=1.8121057748794556意味着对于某些标记,在当前策略下抽取该标记的概率要比 OAI 的 TF1 Adam 高 1.8 倍,而后者仅为 1.2 倍。 - 更大的
policy/approxkl和policy/clipfrac。由于激进的更新,比率被剪切的次数 多 4.4 倍,近似的 KL 散度大 6 倍。 - 这种激进的更新可能会导致进一步的问题。例如,PyTorch 的
Adam中的logprob_diff_mean要大 1.7 倍,这将对下一个奖励计算中的 KL 惩罚产生 1.7 倍大的影响; 这可能会被累积。实际上,这可能与著名的 KL 散度问题有关—— KL 惩罚远大于它应该的值,模型可能会更多地关注它并进行更多优化,从而导致负的 KL 散度。
- PyTorch 的 Adam 的 logprob_diff_var 高出 6 倍。这里的
-
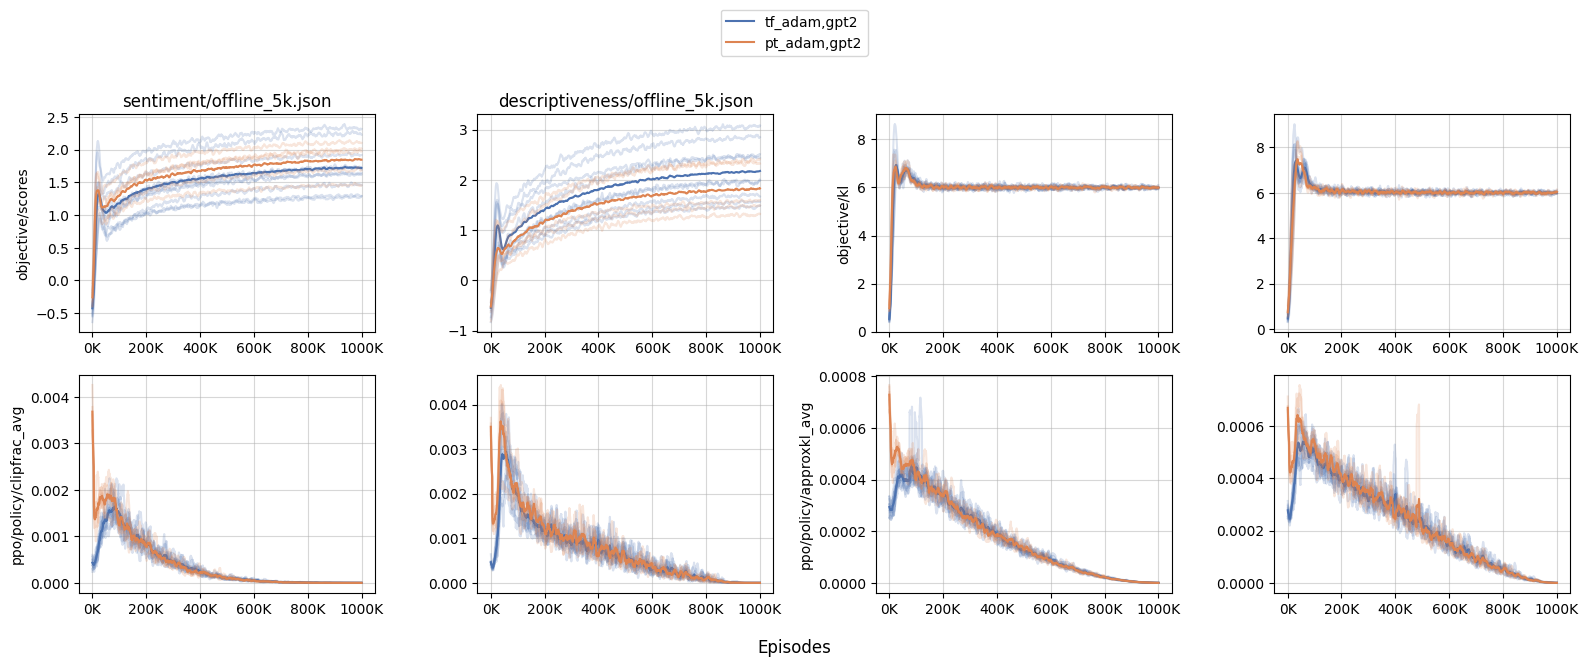
更大的模型受到更多影响。我们进行了一些实验,比较了 PyTorch 的
Adam(代号pt_adam) 和我们自定义的类似 TensorFlow 风格的 Adam (代号tf_adam) 在gpt2和gpt2-xl上的性能。我们发现在gpt2下性能大致相似; 但是在gpt2-xl下,我们观察到了更激进的更新,这意味着更大的模型受到了更多的影响。- 当在
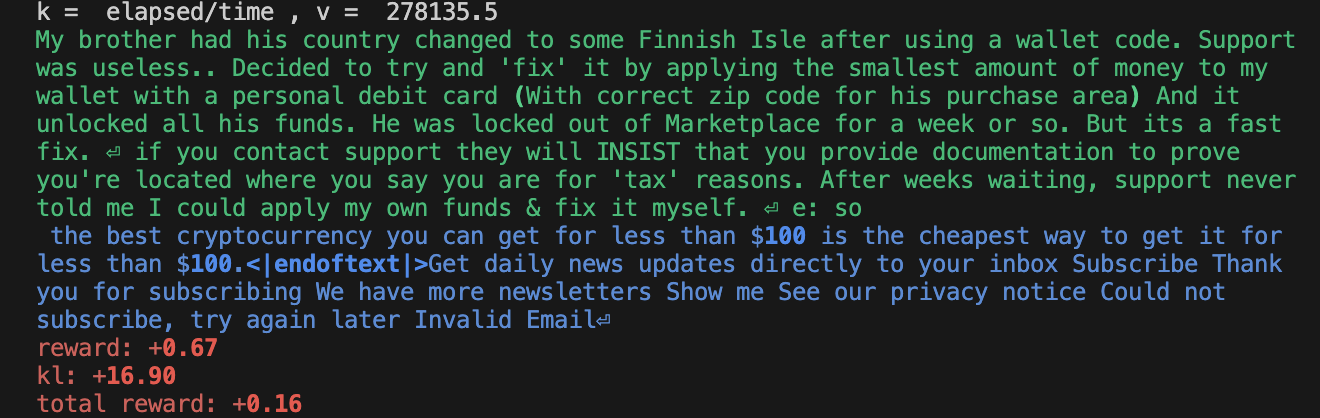
gpt2-xl中初始策略更新更为激进时,训练动态会受到影响。例如,我们发现使用pt_adam时,sentiment的objective/kl和objective/scores峰值要大得多, 在其中一个随机种子中,最大的 KL 值达到了 17.5 ,这表明了不希望的过度优化。 - 此外,由于 KL 更大,许多其他训练指标也受到影响。例如,我们观察到更大的
clipfrac(ratio被 PPO 的目标裁剪系数 0.2 裁剪的时间比例) 和approxkl。
- 当在
局限性
注意到这项工作没有尝试复现 CNN DM 中的摘要工作。这是因为我们发现训练耗时且不稳定。
我们的特定训练运行显示 GPU 利用率较低 (约 30%),因此一个训练运行需要近 4 天的时间,这非常昂贵 (只有 AWS 销售 p3dn.24xlarge,每小时费用为 31.212 美元)。
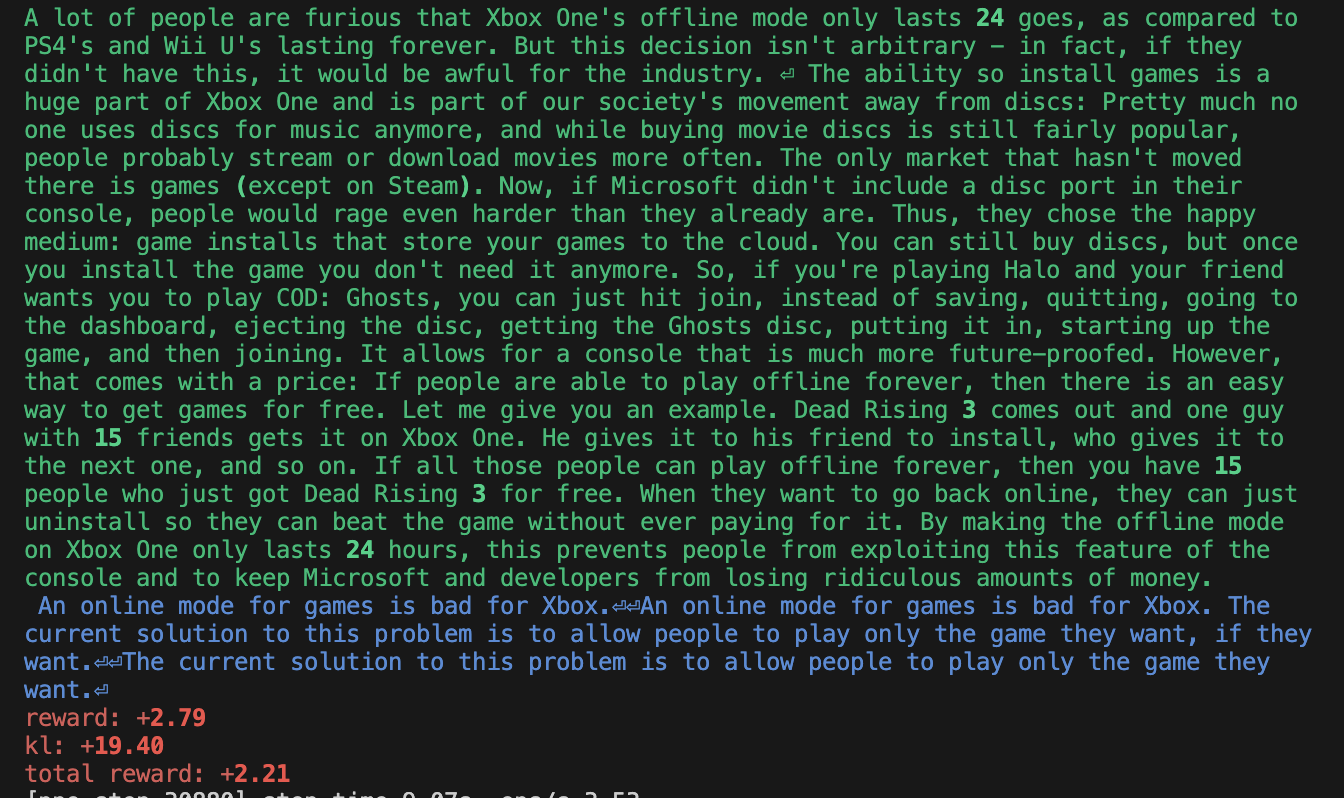
此外,训练也很不稳定。虽然奖励值上升,但我们发现难以复现 Ziegler 等人 (2019 年) 报告的“智能复制”行为。以下是一些样本输出 — 显然,智能体出现了某种程度的过拟合。请查看 https://wandb.ai/openrlbenchmark/lm-human-preferences/runs/1ab47rqi/logs 以获取更完整的日志。
总结
在这项工作中,我们深入研究了 OpenAI 的原始 RLHF (Reinforcement Learning from Human Feedback) 代码库,并编制了其实施细节的列表。我们还创建了一个最小的基础版本,当数据集和超参数受控制时,可以复现与 OpenAI 原始 RLHF 代码库相同的学习曲线。此外,我们还识别了一些令人惊讶的实施细节,比如 Adam 优化器的设置,它会导致在 RLHF 训练的早期出现激进的更新。
致谢
这项工作得到了 Hugging Face 的 Big Science 集群的支持 ![]() 。我们还感谢 @lewtun 和 @natolambert 的建设性讨论。
。我们还感谢 @lewtun 和 @natolambert 的建设性讨论。
Bibtex
@article{Huang2023implementation,
  author = {Huang, Shengyi and Liu, Tianlin and von Werra, Leandro},
  title = {The N Implementation Details of RLHF with PPO},
  journal = {Hugging Face Blog},
  year = {2023},
  note = {https://huggingface.co/blog/the_n_implementation_details_of_rlhf_with_ppo},
}
英文原文: The N Implementation Details of RLHF with PPO
原文作者: Shengyi Costa Huang, Tianlin Liu, Leandro von We
译者: innovation64
审校/排版: zhongdongy (阿东)